This is one the articles in the series of step by step SSIS tutorial. In this post, we are going to
understand Lookup transformation and also see an example to
implement Lookup transformation in 8 easy steps.
Now, Lookup transformation is one of the interesting transformation which is used to implement equijoin between data sources.
We are discussing the same example which we discuss in the earlier post which is Person & PersonPone tables of AdventureWorks.
Suppose, we want Person details and the phone number of person as a result then we can apply Lookup transformation.
When, we applied the Lookup transformation between Person & Person Phone table then we will get two result set.
One of the result sets is the Matched result set in which we will get the Person data and the First Matched Phone number while the PersonPhone table might have multiple phones for a person but we will get only one phone number record because Lookup transformation uses EquiJoin.
In the second result set, we will get unmatched Person records which mean the Person who doesn’t has a Phone number in PersonPhone table.
I think, we have a basic understanding of what is Lookup Transformation. Now, we are going to implement Lookup Transformation step by step.
Step 1:-
So, the first basic step is to add a package and drag-drop data flow task as shown in below figure. You can rename the data flow task as I did in below figure.

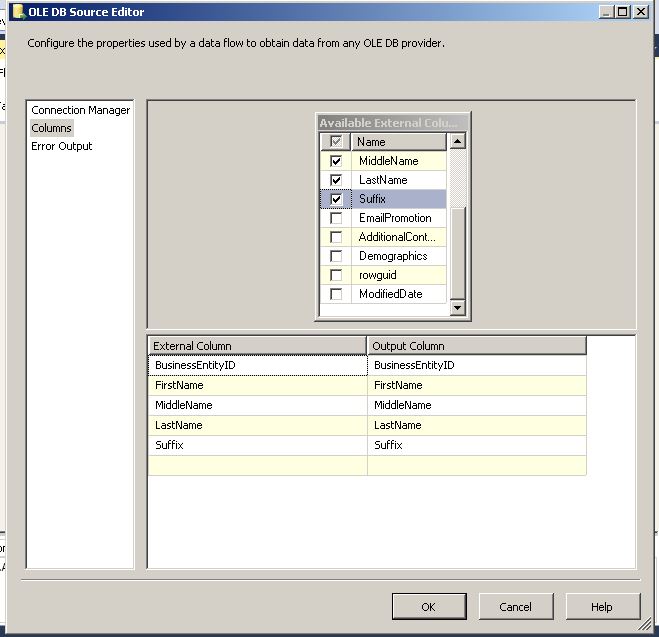
Step 2: - In this step drag drop a data source and configure it for Person table as shown in below figure. If you face any difficulties in this then you can review previous articles of this series

Step 3:- Once the Person table is configured just drag drop Lookup Transformation control and provide the input of Person table Data source to Lookup table. When you try to configure the Lookup you will get the following screen. We will discuss Cache mode separately in detail. In this example, we are using Full Cache and connection type to OLEDB connection Manager.
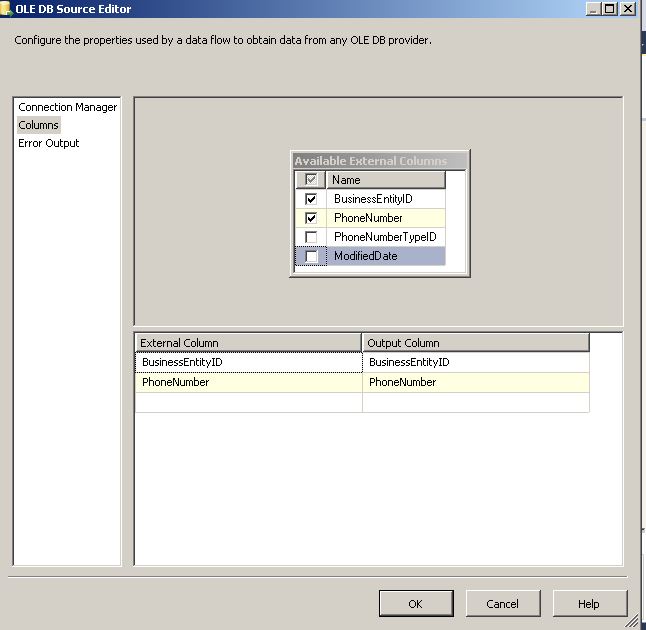
Now, Click on Connection option on the right and configure the PersonPhone table.


Step 4:- Now, configure the Columns relationship between Person & PersonPhone table.To achieve this just drag-drop BusinessEntityId of available input columns of Person table to available Lookup columns which are in PersonPhone table and matched with BusinessEntityId which is common between Person & PersonPhone table. Here we have to select PhoneNumber column which we have to include in the result set.

Step 5:- Now, Drag drop two excel destination source and configure it. As, I did in below figures. Here one Excel is with name LookupOutput.xls which contain matched records.

Below, is another Excel which contains unmatched records. Here UnMatched means the Person records who don’t have phone numbers.

Step 6:- Now, If you see there are 3 output lines coming from Lookup transformation.So, First blue output gives it to Lookupoutput excel which will have all the matched records of person & Person Phone number. You can configure inputs as shown below.

Step 7:- In a similar way, we have to configure unmatched record output. Once, we done with configuration of both Matched & unmatched output, we will get following structure as shown in below screen


Step 8:- Once, everything is configured you can run the package and if everything is perfect then you will get the following screen

I hope above steps are easy and you can implement Lookup Transformation at your end too.
Please, provide your inputs.
Enjoy !!!
RJ!!!
Now, Lookup transformation is one of the interesting transformation which is used to implement equijoin between data sources.
We are discussing the same example which we discuss in the earlier post which is Person & PersonPone tables of AdventureWorks.
Suppose, we want Person details and the phone number of person as a result then we can apply Lookup transformation.
When, we applied the Lookup transformation between Person & Person Phone table then we will get two result set.
One of the result sets is the Matched result set in which we will get the Person data and the First Matched Phone number while the PersonPhone table might have multiple phones for a person but we will get only one phone number record because Lookup transformation uses EquiJoin.
In the second result set, we will get unmatched Person records which mean the Person who doesn’t has a Phone number in PersonPhone table.
I think, we have a basic understanding of what is Lookup Transformation. Now, we are going to implement Lookup Transformation step by step.
Step 1:-
So, the first basic step is to add a package and drag-drop data flow task as shown in below figure. You can rename the data flow task as I did in below figure.

Step 2: - In this step drag drop a data source and configure it for Person table as shown in below figure. If you face any difficulties in this then you can review previous articles of this series

Step 3:- Once the Person table is configured just drag drop Lookup Transformation control and provide the input of Person table Data source to Lookup table. When you try to configure the Lookup you will get the following screen. We will discuss Cache mode separately in detail. In this example, we are using Full Cache and connection type to OLEDB connection Manager.
Now, Click on Connection option on the right and configure the PersonPhone table.

Step 4:- Now, configure the Columns relationship between Person & PersonPhone table.To achieve this just drag-drop BusinessEntityId of available input columns of Person table to available Lookup columns which are in PersonPhone table and matched with BusinessEntityId which is common between Person & PersonPhone table. Here we have to select PhoneNumber column which we have to include in the result set.

Step 5:- Now, Drag drop two excel destination source and configure it. As, I did in below figures. Here one Excel is with name LookupOutput.xls which contain matched records.

Below, is another Excel which contains unmatched records. Here UnMatched means the Person records who don’t have phone numbers.

Step 6:- Now, If you see there are 3 output lines coming from Lookup transformation.So, First blue output gives it to Lookupoutput excel which will have all the matched records of person & Person Phone number. You can configure inputs as shown below.

Step 7:- In a similar way, we have to configure unmatched record output. Once, we done with configuration of both Matched & unmatched output, we will get following structure as shown in below screen


Step 8:- Once, everything is configured you can run the package and if everything is perfect then you will get the following screen

I hope above steps are easy and you can implement Lookup Transformation at your end too.
Please, provide your inputs.
Enjoy !!!
RJ!!!


