Pages

Tuesday, March 28, 2017

How is easy to work with JSON in SQL SERVER 2016 ?

If you are a developer then surely you might have used JSON (JavaScript Object Notation) but, if not then don’t worry you might use sooner than later. JSON is kind of ecosystem which is most popular in the various area for exchanging the data. If you talk about charting solution, AJAX, Mobile services or any 3rd party integration then generally JSON is the first choice of the developers.

If you see nowadays most of the NOSQL database like Microsoft Azure Document DB, MONGODB etc. also using JSON ecosystem and some of them are based on JSON.

As it is such a popular growing system So, why not in SQL SERVER?
In SQL SERVER 2016 JSON introduced. This we can say a step or bridge between NON-relation database and relational database by Microsoft SQL SERVER

SQL Server 2016 providing following capabilities when you are using JSON
  1. Parse JSON by relation query
  2. Insert & update  JSON using query
  3. Store JSON in database

If you see it then conceptually it is similar to XML data type which you might use in SQL SERVER.
The good thing  in SQL SERVER 2016 for JSON there is no Native data type.  This will help in migration from any NOSQL to SQL SERVER.

SQL server provides bidirectional JSON formatting which you can utilize in a various way. Suppose data is coming from the external source in the JSON format then you can parse it and store in table structure (if required) in another case external source require data in JSON format while data in SQL SERVER in tabular format so both the purpose can easily solve with  SQL SERVER’s JSON feature.

Now, let’s jump directly to the practical to check JSON capabilities in SQL SERVER

1) FOR JSON AUTO
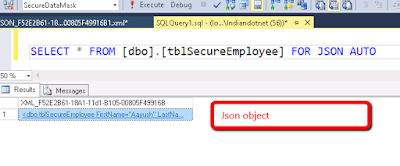
It is similar to  FOR XML AUTO.  It will return JSON object of selected column where column name is treated as a Key or in other words we can say it will format the query result in JSON.

when you run above command the result will be like as shown in below figure.


2) FOR JSON PATH: -
It’s exactly like JSON auto the only difference is instead of SQL SERVER we have full control over the format. JSON Auto take predefined column schema while with JSON path we can create a complex object.
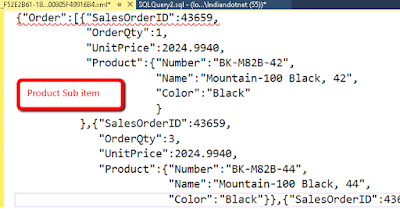
For example, we are using AdventureWorks Sales order table and joining that with product table to get sub-node. If you see in below image we have added Root node as well. This root Node can be added in JSON auto as well if required.


Now, when you run the above query we can get complex JSON object as follows

3) IsJSON function:-
By the name, it is clear that this is a validating function.
To cross check whether the provided string is a valid JSON or not we can run ISJSON.

4) JSON_VALUE:-
  By the name, it is clear that if you want to get the value of the particular key of JSON then you can use this beautiful function which is JSON_VALUE.


5) OPENJSON function:-
This is a very beautiful function which you can use to parse external schema. Suppose, you got a JSON string from a mobile service which you will directly pass to SQL Sever and SQL SERVER stored procedure will do rest of the operation to parse it. The parsing and other operation can be easily handled by OPENJSON. The only tweak here that it required database compatibility level 130   which you need to do (if not compatible with level 130)


There are many other interesting things which we will cover later.
Please, provide your inputs.
RJ
Monday, March 27, 2017

How easy it is to implement Row Level Security in SQL SERVER 2016 ?

To understand RLS (ROW LEVEL SECURITY) let’s understand the different problems first.
Problem 1 Suppose, you have a Multi-tenant e-commerce website and different companies registered on your website and you have centralized single database for all the client. Now as a product owner it is your responsibility that one tenant’s data should not be available to another tenant.  This is a very common problem.
2. Now, Suppose you have hospital database in which you have login user of different doctors & nurses. Now, your challenge is to show data to doctor or nurses to their relevant patient to whom they are giving treatment, not any other patient data should be available .
Here, limiting the user’s access to only certain rows of the data in database many have various reasons like compliance standards, regulatory need or security reasons.
Now, I know you were thinking that all the above problem can be resolved at code side easily by writing custom logic. I will say here yes you are right but this is not the 100% solution.  For example, if you have 4 different application like web, mobile, console, windows (Excel) and all has their own DAL then you have to implement this custom logic to every application and suppose  tomorrow if any time a new 3rd party came which want to integrate your data  or access database directly then in such cases it is tuff to apply same logic.
So, all the above problem can be easily handle using SQL SERVER 2016’s feature which is ROW Level Security (RLS). Security is one of the key areas which is handled in SQL SERVER 2016 very seriously.  As RLS (Row Level Security) is centralized security logic so you don’t need to repeat same security logic again and again.
As the name suggested Security implemented at Row Level in SQL SERVER 2016. In the Row Level, Security data is access according to user roles. It is a centralized data access Logic.
RLS has following properties
  • Fine-grained access role ( control both read & write  access to specific rows)
  • Application transparency  ( No application changes required)
  • Centralized the access within the database
  • Easy to implement & maintain
How RLS works?
RLS   is a predicate based function which runs seamlessly every time when a SQL is run on particular table on which RLS  predicate function implemented.
There are 2 predicates  which can be implemented in RLS
1) Filter Predicate: - By the name, it is clear that it will filter the row or we can say exclude the rows which do not satisfy the predicate and stop further option like select, Update & Delete.
for example: Suppose, you want to restrict doctor to see other doctor’s patient data then in such case you can apply filter predicate.
2) Block Predicate: -  This predicate helps in implementing policy by which insert, update and delete rows will prevent which violate the filter predicate. In other words, we can say it explicitly block write operation.
For example, you have multi-tenant application and you want to restrict one tenant user to insert or update other tenant’s data. Or suppose you have sales representative who belongs to specific region so they can not insert , update or delete other region’s data.
Demo:-
I know you will be super excited to see the demo of this feature so. Let’s do it right away.
There are 2 basic steps to create RLS
a) Create inline table function  or we can say predicate function  and write custom logic to control user access to every row
b) create the security policy and apply it.
In this demo ,I am creating a  new table called Patients which has following schema. 


Here, I have inserted 2 rows for Nurse1 & 2 rows for Nurse2

The objective is to show only those rows to Nurse1, Nurse2 in which they are the in charge and a doctor user can see entire table’s data.
To achieve this let first create 3 users  in database 


Once the users are created the next step is to grant permission of select to Nurse1 & Nurse2 user and full permission to doctor user.


Now, before creating function it is a standard to create a security schema in our case we are creating a schema with name sec as shown in below figure.
Now, create a function which will have security logic. The Logic is very simple if the user is doctor Or any in charge name then return 1 else 0.


Now create a security policy to proceed further


Till now we are good to go. Now, let’s test the security policy.
Firstly, running the select query with default user “dbo.”  and we have not given permission for this user if you see fn_RLSPredicate we have not mentioned it so obviously the result would show “0” records.

Now, running the same select statement but executing with “Nurse1” login then you will find 2 records which are relevant to Nurse1 is visible.

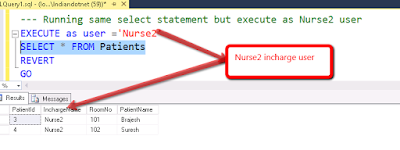
Similarly, I am running the same statement for Nurse2 user by running command “Execute as user” so, again I will get 2 records

Now, running the same statement with Doctor user and as per our expectation, it should show all 4 records.

So, as you can see we have achieved the goal using RLS (Row Level Security) feature. Now, next thing which might occur in your mind how to disable this policy if required then doesn’t worry it is very simple. Just alter the security policy and make state = off as shown in below figure.

I hope till now we are good to work on RLS. In next couple of post, we will dig deeper in RLS.
Please, share your thought for RLS.

Sunday, November 27, 2016

Why Do People Think Dynamic Data Masking is a Good Idea? - SQL SERVER 2016 #5

Data security is always one of the important points which can not be ignored. Nowadays if you are working for any specific domain like Banking or Healthcare then there are a lot of compliance rules which you have to follow.
Data Masking is one of the best ways to help you to secure your sensitive data by a dynamic mask encryption.
This is one of the best features of SQL SERVER 2016 which I personally like most.
With the help of Dynamic Data Masking, you are just applying a mask to your sensitive data.  for example, if your system is storing SSN data then it should be visible to privileged or we can say authorized user only.
Dynamic Data Masking has following features:-
1) It masked the Sensitive data.
2) There will be no impact on functions & Stored Procedures and other SQL statement after applying this.
3) Applying the Data Masking is super easy.
4) You can allow any database user/role to see unmasked data by just simple Grant & Revoke Statement .
5) Data is not physically changed.
6) It is just on the fly obfuscation of data query result .
7) It is just  a T-SQL command with basic syntax.
Now , let us understand how to implement it.
Data masking implementation is very easy and below is the syntax for it.


Here, if you see the syntax is very simple the only new thing is MASKED and with (function=function name) only.
The function is nothing but the way to mask the data. SQL SERVER 2016 has following  different functions to mask the data
1) Default() function:- This is basic masking with the help of this function you can easily mask any field.
for example, your first name or last name field can be masked like XXXX etc.
2) Email() function :- If your column is email type or you we can say if you store Email in your column then you should use the Email() function for masking.
for example, your email can be mask like  RXXXX@XXXX.com
3) Partial () function:- With the help of this function you can mask specific data length and exclude some part of data from masking logic. for example, 123-4567-789 is your phone number then with partial masking feature you can mask like 12X-XXXX-7XX.
4) Random() function – By the name it is clear that you can mask the data with any random number range we will see more below in the hands on.
Remove Masking :- This is also possible that you applied a masking to a column and later on you don’t want that masking. So , don’t worry it very easy to remove masking from a column. below is the syntax for same.


Now, let’s understand this by an example.
In the example we are using a new database “SecureDataMask” in this database we are creating a tblSecureEmployee as shown in below figure.


Now, in this table, we are inserting couple of data for testing as shown below


Now we are applying different masking on this table’s column
1) Default Masking : In the table, we are applying default masking on LastName


2) Email Masking :- In the table, we are going to apply Email masking to email column below is the syntax for it.


3) Partial Masking:- For SSN we are going to apply custom masking. below is the syntax for same. Here as we aware that SSN is 11 characters long in our database. we applied the partial masking to show first two & last two characters in original value and rest other in the mask.


4) Random Number Masking :-  In our table, we are going to apply Random number masking to Securepin column as shown below.


Here, so far we are done with all the masking now.  let me run the select statement to test it.


If you see the data is still in the original state because I logged in using  privilege account “SA”. now, to test the masking let me create a new user account.


After creating the account we are trying to log-in with a new account as shown in below screen.


After our successful log in, we will run the select statement on same database’s table as we did earlier. If you see below snap you will find that we got masked data for LastName, Email, SSN, and securePin.


Now, it might be a rare case but suppose you want to remove the mask from any column on which you applied masking then don’t worry it is super easy.
Suppose, from the same table we don’t want mask on the LastName then below is the syntax for same.

Now, let me run the same select statement seeMask_user. You will find the Last Name is unmasked now.


From above few changes you can secure your data via Dynamic masking and as mentioned above there will be no impact on your existing function ,stored procedure because data is not physically changed.
I hope you may like this feature.   Please, share your input for same.
Enjoy !!
RJ

Saturday, October 22, 2016

How DATEDIFF_BIG a new feature of SQL SERVER 2016 Can Keep You Out of Trouble

In the series of SQL SERVER 2016, this is a new post. in this post, we will discuss DATEDIFF_BIG and how it is helpful.
So, before jumping into directly in technical details, we all know that time is very important and every second valuable and countable but sometimes every microsecond & nanosecond is also countable Smile . For such operations in which every microsecond & nanosecond is countable, we can use DATEDIFF_BIG function.
As you aware the BIGINT range is from -9,223,372,036,854,775,808 to 9,223,372,036,854,775,807.  Here if any difference (Micro & Nano) second is out of the the mentioned range then DATEDIFF returns that value else return error(Obviously).
Below is the basic syntax if DATEDIFF_BIG although it is similar to DATEDIFF. We can say it is a extended version of DATEDIFF.
DATEDIFF_BIG( datePart, start Date, End date)
The value of datePart is same like DATEDIFF function.
For example if you want to collect millisecond difference then use ms, microsecond then mcs and for nanosecond ns.
As per the MSDN   for the Millisecond, the maximum difference between start date & end date is 24 days, 20 hours, 21 minutes and 23,647 seconds. For Second, the maximum difference is  68 years.  
Now, let see why this DATEDIFF_BIG introduced so, I am running a DATEDIFF  function in SQL SERVER 2012 and see what we get after running that query.

DATEDIFF_BIG in SQL SERVER 2016


You can see in above query we got an error of overflow.
Now, we are calculating the same difference from DATEDIFF_BIG in SQL SERVER 2016. See, below snap for same.

DATEDIFF_BIG in SQL SERVER 2016 by Indiandotnet


Isn’t it great ? Although, I am scarred with those applications who calculate milliseconds Sad smile.
Anyways, it is good to know feature.
Do provide your feedback for the post it is very valuable for us.
RJ !!!

If You Read One Article About Split String in SQL SERVER 2016s Read this One #3

In the Series of SQL SERVER 2016, this is another post. Before Jumping in detail just think if you have a comma or other separator string and if you have to split it by separator field then for such task  in previous SQL SERVER versions either you will write a function which split the string and return desire values in a column  or
you will use XML function or  might be different custom functions.
Let me explain this with below example. Suppose you have a string like below
DECLARE @FriendList AS VARCHAR(1000)
SET @FriendList ='Ravi,Suyash,Vaibhav,Shyam,Pankaj,Rajul,Javed'

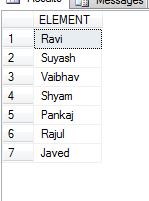
Now you want output like below
String split in SQL SERVER 2016


Then in such cases, you will  follow 2 approaches (their might be other as well)

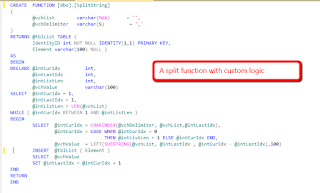
Approach 1:- Write  a function like below  and use it.
Different ways of spliting a comma seperated string in SQL


And once this function is created you can use like below
custom string split function


Approach 2 :- You can use XML option in SQL SERVER as  shown in below

split string using XML in SQL SERVER

So, the good news is now in SQL SERVER 2016 you don’t need to write  so many lines to split any string. In SQL SERVER 2016 a new string function is Introduced which is
STRING_SPLIT
The use of this function is very easy and below is the syntax
STRING_SPLIT (string, separator)
Now, let me show you same output using STRING_SPLIT function
string_split function in SQL SERVER 2016


Isn’t it easy ?
I hope you will like this easy way to split the string.
Provide your feedback.
RJ !!!

Sunday, October 16, 2016

Do you know Compress & Decompress function in SQL SERVER 2016 ?

This is another article in the series of SQL SERVER 2016 Journey . I am pretty much sure you might aware of Gzip Compression algorithm. If not then try  this link.

So, SQL SERVER 2016 introduce this two awesome functions for Compress & Decompress the data.
Before SQL SERVER 2016 version we have data compression feature like Page & Row compression (check Previous post for it Link )which is different then this column value compression.

In SQL SERVER 2016 Compress function,  data compression is done via GZIP algorithm and return VARBINARY(MAX).

Below is the simple syntax of Compress function

Compress (Expression)

Here Expression can be nvarchar(n), nvarchar(max), varchar(n), varchar(max), varbinary(n), varbinary(max), char(n), nchar(n), or binary(n)

Decompress function is just opposite of  compress function. It is used to decompress the value of VARBINARY which is converted using Compress function. The only tweak is you need to cast the output of Decompress function  in specific data type to make it readable (if using varchar ,nvarchar compression) .

below is the simple syntax of Decompress
Decompress (Compressed string)


Let’s understand this via an example as shown below .

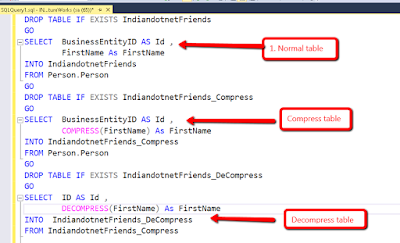
Compress function

In this example I have taken 3 tables with exact same schema & data

  1. 1) IndiandotnetFriends
  2. 2) IndiandotnetFriends_Compress
  3. 3) IndiandotneFriends_Decompress

You can see  snap in which we are inserting same data.
As the name suggested in first table normal data from Adventureworks’s person table.
In second table we are inserting compressed value of first Name  and in 3rd table we are inserting decompress value of First Name from the Compressed table.
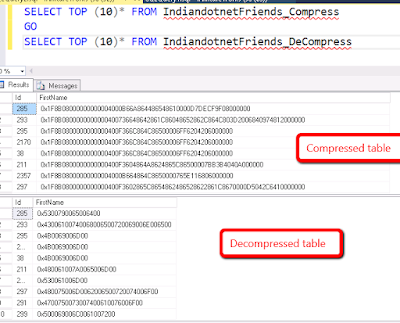
Now, let’s check compress  & decompress table data
Decompress function


Now, Your might thinking that the output of both compress and decompress is not readable.
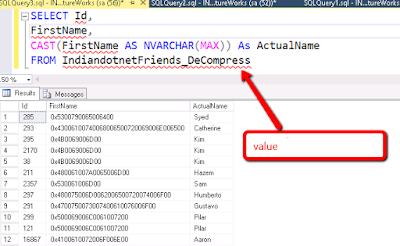
So you are right to make data readable of Decompress table we need to type cast.
See below snap for same.

Decompress type casting


Till now we know how to use this Compress & Decompress function. Now, let me share the benefit of using Compress. if you see below snap you will find that data length of compress is comparatively less than normal and decompressed data length .

Datalength in compress data


Obviously, compression helps you somewhere in the overall performance of your application.
The good point is  you can pass the compress data to your .net application and decompress using GzipStream as well.

The only thing which we need to take care is type casting. Suppose your base column which compressed is VARCHAR then you need to typecast again in VARCHAR.

Now, next question is where we can use this functions. So,  we can use in compressing large object like binary data in which we save jpg, pdf , word document etc..

I hope you will be excited in using this function.

Please, share your input.
RJ!

Saturday, October 15, 2016

Here Come New Ideas for DROP IF EXISTS in SQL SERVER

In the Series of SQL SERVER 2016 journey, this is our new article. In this article, we are sharing a new cool feature which introduced in SQL SERVER 2016 which is DROP IF EXISTS (DIE) .
In our development many times it happens that we need to drop a table and as a best practice we write the following syntax as shown in below figure

Now, in SQL SERVER 2016 the same task is super easy. You can write the following syntax to drop the table object

DROP TABLE IF EXISTS TABLENAME
The best part is if suppose the object does not exist then  here will be no error execution will continue.
Let me share one more example of Dropping a stored procedure.

Similar, way we can write for following data objects and with the following syntax

Procedure:- DROP PROCEDURE IF EXISTS Procedure Name

Assembly:-
DROP ASSEMBLY IF EXISTS Assembly Name

ROLENAME :-
DROP ROLE IF EXISTS ROLENAME

TRIGGER :-
DROP TRIGGER IF EXISTS Trigger Name

VIEW:-
DROP VIEW IF EXISTS View Name

RULE:-
DROP RULE IF EXISTS RULENAME\

Type:-
DROP TYPE IF EXISTS Type Name

Database:- DROP DATABASE IF EXISTS Database Name

Schema:-
DROP SCHEMA IF EXISTS Schema Name

User:-
DROP USER IF EXISTS Username

SECURITY POLICY:-
DROP SECURITY POLICY IF EXISTS Policy Name

View :-
DROP VIEW IF EXISTS View Name

FUNCTION:-
DROP FUNCTION IF EXISTS Function Name

SEQUENCE:-
DROP SEQUENCE IF EXISTS Sequence Name


Synonym:-
DROP SYNONYM IF EXISTS Synonym Name

I like this feature I am sure you will also like this.

Please, do share your feedback for blog post.
Enjoy !!