Pages

Sunday, July 26, 2015

A simple way for consistency TIP #106


Whenever we develop application of maintain application we define sets of rules or policies  like naming convention , data type, database & SQL SERVER properties (like which property should be unable or disable)  but the problem is to cross check or to enforce these properties is very tedious.

To enforce the policies SQL SERVER provided a great feature which is Policy Based Management.  This is the feature which helps you to not only write the policies or rules but also enforce and cross check whether those rules or policies is followed in your environment or not.

Although these feature is mainly for A DBA but I think it is good for a everyone who love SQL Server.

Now let me share an example which will help us to better understand Policy Based Management.

So to begin with  firstly we have to open the Policy Based Management’s interface. Which we can get in Management folder in SQL SERVER’s object explore window. (You can see below yellow highlighted)

1

So when you expand the Policy Management in Management feature  You will see 3 different folders which are facets , condition and policies.

So there are  around 84 in build facets which is basically properties for different conditions.

Conditions are basically simple check applied using facets.

Policies are created on condition which will enforce once it created.

Below I am creating policy to check table who has row count =0 (Little bit odd) .You can try with stored procedure name not started with sp_ (will be good start as well).

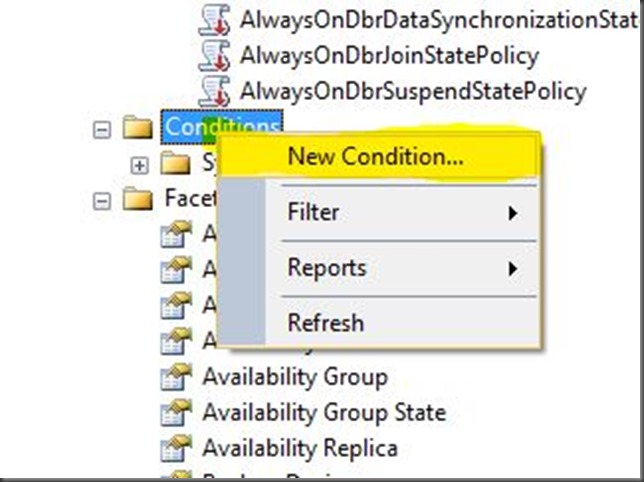
So , Now create a simple condition by right click and choosing menu New condition

2

You will get following screen just add condition

3

We are creating a simple condition which will check the table which has RowCount is 0.

11

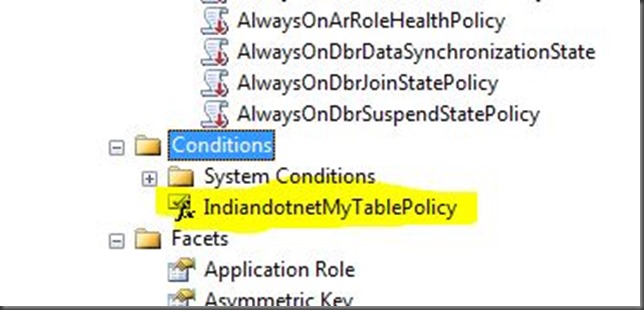
Once you created this condition you will get condition in conditions folder.

4

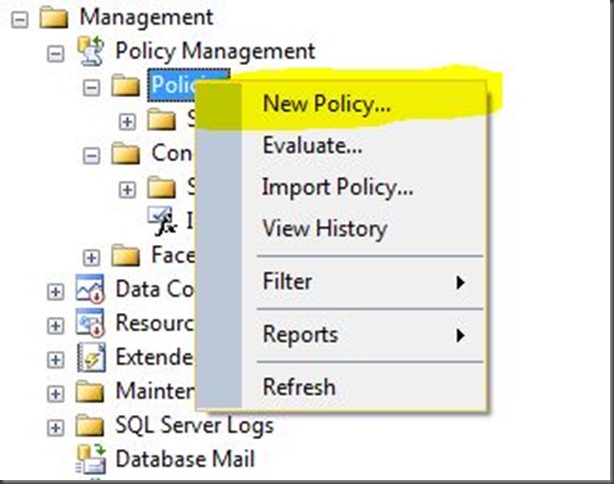
Now once condition is created we have to create policy. To create policy we have to right click on policy and select new policy.

5

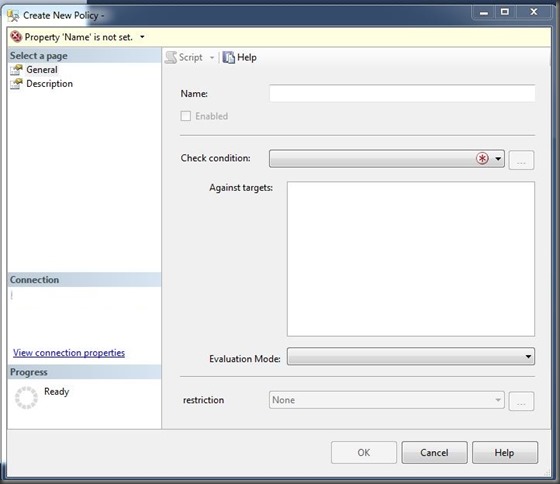
When you click the new policy you will get following screen

6

Now we can add check Condition which we have created as shown in below figure. We can apply policy against target Like in below snap we want policy against every table for IndiandotnetDB

NewPolicy

We can set evaluation mode according to our need.

Once you saved the policy we can run it any time.

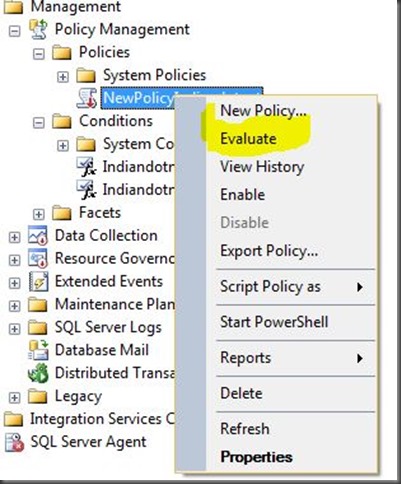
We can evaluate policy by right click Evaluate as shown in below figure

9

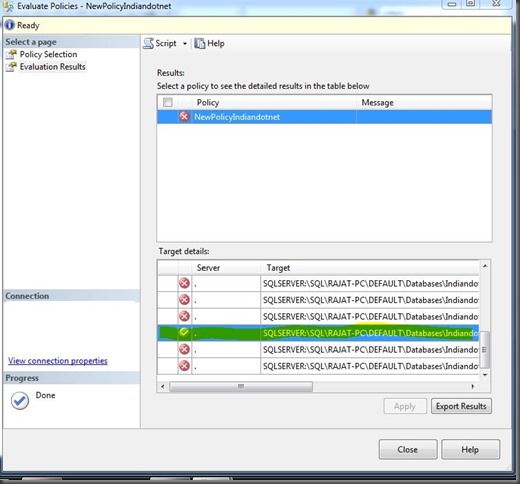
When we run the policy we will get following result

10

So , If you see above highlighted row which means a table contain  Row Count.

I hope with above steps you understand a basic way to create Policy Base Management concept.

Policy based management is surely a great tool to manage  database.

Please feel free to give a chance whether you are DBA or not.

Enjoy PBM !!

Happy learning !!

RJ

Saturday, July 18, 2015

Merge statement- A simple way for DML TIP#105

When, I first saw this statement a Hindi proverb  come to my mind which is “1 teer 2 nishane” . The meaning of this proverb means a single bow which hit two different aim in one shot.

So let me explain “Merge” statement in more detail. With the help of this Merge statement we can do insert ,update and delete with a single statement.

Let’s understand this by an example. Suppose we have two tables Source and Target as shown in below figure

Source_And_Target_1

Now these tables will have some data so lets write query to insert some pre pop data

insert_data

Now what we want follow things

1) if  employeeId of source and target tables are not matched and if employee name starts with “S” in the source table  then insert the value in target table.  (means insert Sunil & steve’s records from source to destination table)

2) If employeeId of source and target tables are matched then update the Employee name from source table to target table  (if any record matched then update the employee name which not the case with current data)

3) If employeeId of source and target tables are not matched and Employee name in target table starts with “S” then delete that row from target table. (So Sunidhi’s row will be deleted from target table)

Let’s write Merge Statement  for all the 3 above work.


Indiandotnet_Merge

Now you observed that there is one more statements which is written explicitly apart from the condition which is OUTPUT clause which helps us to determine what operation is performed.

When you run this you will get following output

Operations_Merege

Now see the actual data in both the table.

ActualData_Merege


So, a simple merge statement is doing all 3 operations like update, insert ,delete.

I hope this tip will help you some where.

Enjoy !!

RJ!!!

Thursday, July 9, 2015

Proper Aliasing will help you somewhere TIP#104

Recently, When we were delivering session on “SQL SERVER” one of the persons asked why we require Aliasing so I thought this might be question in everyone’s mind.

So lets start with couple of well know statements then we will see the actual problem where we need it explicitly.

There are two type of aliasing we can do a column aliasing & table aliasing.

Aliasing might help you in readability of stored procedure or function. It helps when you retrieving any calculated or derived column which need in your application so lets starts with some example.

if you see below example we are calculating a column but it does not have column name so fetch this specific value is very difficult so we require column Aliasing here

Calculated_Column

So as you saw above figure the calculated column is with name “No column name” we can not retrieve it easily so we require aliasing

Total_Price

Now ,lets talk about the table aliasing. So table aliasing help you in readability and it is helpful when you require self join or same table is required in join.

Lets see in below example we did a self join and we required aliasing

SelfJoin

The aliasing will be helpful when same table join is required multiple times.

I hope this tip might helpful to someone.

I would appreciate if you provide you inputs as well where we can utilize aliasing.

Enjoy!!!

Th

RJ!!!

Monday, July 6, 2015

It is OK its NULL only TIP #103


We always take NULL very lightly. Like if we are designing database then whether it is necessary or not we allow the data field to accept null.We think it will not affect anything.

Actually , at some point this is not always true.

According to Microsoft NULL is an Unknown value. It is not EMPTY & ZERO. It is just unknown.

Now according to my experience NULL is very sensitive and should be handle with care.

While we are designing the database and in a particular table if a field can not be null according to business rule then please don’t allow NULL in that field for data consistency.

For example if we have a StudentEnrollment table and in the StudentEnrollment table  we have reference of StudentId which is primary key of StudentId and that can not be NULL then please don’t make the field null able.

Let me share some more interesting facts

1) Two null value not equal :-  Let me explain it with an example

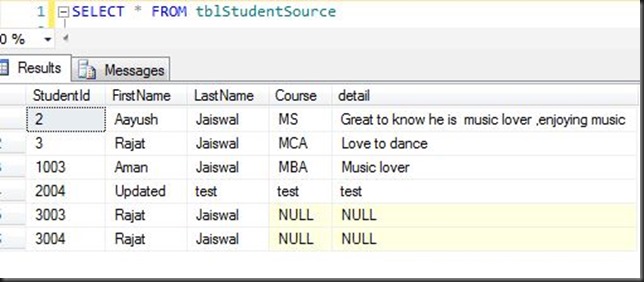
Suppose I have tblStudentSource table  which has different columns and a course column which have some null values  as shown below

Indiandotnet_Student_Source_Table

Now see below snap where we are comparing the null value course column. You will find in below snap that there is no result while we have null value in course

NULL_IS_NOT_EQUAL_TO_NULL

2)  Use IS NULL or IS NOT NULL  to handle null able column:-  If a column is null and you want to show all the columns which are null then instead of comparing NULL value with column as shown in above figure use IS NULL as shown in below figure

IS_NULL

In similar way if we want result which not have null course then we can write below query

IS_NOT_NULL

3) Handle NULL carefully with IN clause

Let me explain with an example so we have 2 tables which are tblStudentSource (as shown in above (image 1) and another table which is tblCourse as shown in below figure

tblCourse_Indiandotnet

Now if you see we have course column in tblStudentSource table which has values similar to tblCourse’s course column and tblStudentSource’s course column contain some NULL values

Now suppose we wrote following statement and expecting that it will return all the course which are in tblCourse

NULL_Return_Nothing

Oh !! it is not returning any course. The reason behind it is NULL is not handled properly. Now to get desire result we have to write following statement

ISNOTNULL_WITH_IN 

So , be always careful when your column has null values.

I hope the above points might help you somewhere.

Enjoy !!!

Keep learning & Keep Sharing !!

Thanks

RJ

Thursday, July 2, 2015

Microsoft MVP–A dream came true


Dear All,

Microsoft  Most Valuable Professional “ – MVP  is one of the prestigious tag. It is one of the dreams which came true today.

Today , I got the E-mail that I am an MVP in SQL SERVER. 

I am speechless but would like to say a big thanks to everyone who provided their feedback all the time , motivated me each and everyone who helped me to learn more and more.

A special thanks to Sir Jeff Moden  who provides inputs all the times.

Thank you everyone

Thanks for inspiring Smile

Keep sharing  & keep learning

Thanks

RJ