Pages

Saturday, December 27, 2014

Change Data Capture (CDC)–An easy way to track data changes of a database–TIP #79


In last TIP #78  we have discussed Change tracker (CT) which was introduced in SQL SERVER 2008. CT feature only tracks which row is changes means on which row Insert/update/delete operation is performed but it does not track what exact value is changed.

If we want an audit of database means whatever changes occurred in database we want to capture those changes and later on see what are changes made then before CDC feature we have to right triggers but now in this case we can use Change Data capture (CDC) feature.

By the name it is clear that it capture the data which is changed.

Lets understand here step by step how to enable this feature

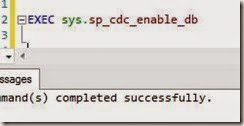
Step 1:- The first important step is to enable CDC on selected database. To enable CDC we have to write following command

EXEC sys.sp_cdc_enable_db

EnableCDC

Note:- sometime you may get error while doing this so just cross check your database owner.

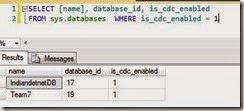
We can cross check whether CDC enable or not on database by following command

SELECT [name], database_id, is_cdc_enabled  FROM sys.databases  WHERE is_cdc_enabled = 1

CDC_Enable_database_List

Step 2:- Once we have enabled CDC setting on Database then we need to enable same setting for table which we need to capture.

For this we have to write following command

EXEC sys.sp_cdc_enable_table
    @source_schema ='dbo',
    @source_name ='tblStudentCDC',
    @role_name ='StudentCDCRole',
    @supports_net_changes = 1

image

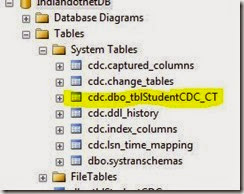
Now When we run above command, we will find following items added in our database. We will find new tables created automatically in our database under CDC schema as shown in below figure

New_cdc_tables_for_StudentCDC

Whenever we enable CDC for a table a new table is created in System tables (if already not created) under a new schema which is “CDC” which denote change data capture.

a) CDC.captured_Columns:- This table contains all the captured columns of a CDC enabled tables.

As shown in below figure:

SELECT * FROM [cdc].[Captured_Columns]

cdc_captured_Columns

b) CDC.Change_tables:- By the name it is clear that this will table will contain list of all the tables on which we have enabled CDC feature.

SELECT * FROM [cdc].[change_tables]

cdc_change_tables

c)CDC.Index_Columns:-  This table keeps information of all the Indexes of a table

SELECT * FROM [CDC].[Index_Columns]

cdc_index_column_detail

d) [cdc].[ddl_history]:-  This table contains all the information of schema changes of a CDC enabled table.

SELECT * FROM [CDC].[ddl_History]

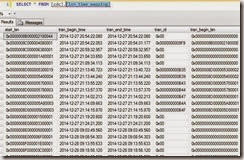
e)[CDC]. [lsn_time_mapping]:-  This table keeps all the LSN ( Log Sequence Number)related information. The base of this table is whatever the transaction done on the CDC enabled table that will be capture in this table.

SELECT * FROM [CDC].[lsn_time_mapping]

cdc_lsn

On the same time few jobs also created which you can find in SQL SERVER agent as shown in below figure

SQL_Server_Agent

Step 3:-We can also cross check all CDC enabled tables by using following command

SELECT [name], is_tracked_by_cdc  FROM sys.tables  WHERE is_tracked_by_cdc = 1

Cross_check_CDC_enable_Table

Step 4:-  Every captured table has suffix _CT and  the name is same as enabled CDC table. In current scenario we have enabled CDC feature on tblStudentCDC so the capture table is tblStudentCDC_CT.

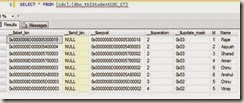
Now we can find all the data change reference of a CDC enabled table by following command.

SELECT * FROM [cdc].[dbo_tblStudentCDC_CT]

tbl_StudentCDC_CT

Sometimes it is also called mirror table which keeps all the track.We will find following extra columns

_$Start_lsn,_$end_lst_$sequal,_$Opeartion,_$updatemask

_$Operation column track all the operations on the table and the different values denotes  different operations status as mention below
Like if value is 1 then it is a Delete Statement (means record deleted from main table)
if value is 2 then it is Insert Statement (means record inserted in main table)
if value is 3 then it denotes Value before Update Statement
if value is 4 then it denotes Value after Update Statement

So, with this easy steps we can enable CDC on database and tables and can enjoy this feature.

We can easily disable this feature which we will discuss in the next post.

Till than enjoy CDC.

Enjoy !!!

RJ !!!
Sunday, December 21, 2014

Change Tracking–an easy way to track your changes TIP#78


I am pretty much sure by the title of this post you had idea of the post content. Although I am late to post this feature Smile but anyways Change Tracking (CT) is a feature came in SQL SERVER 2008.

As the name mention it track the changes like DELETE, INSERT , UPDATE type DML operations which we can synch to another database. (Microsoft Synch Framework).

In simple word what ever we change in table will be track by Change Tracking feature.

The main constraint which I would like say here is there should be a primary key in table for which we have enabled this CT (Change tracking) feature.

Now your next question is how to use this feature so not to worry below is step by step way to use this feature.

Step 1:- First step is enable Change Tracking property of database. you can enable this property by right clicking database property as shown in below figure.

Database_Change_Tracking_Settings

Or you can write following query to enable CT (Change tracking) feature on database

ALTER DATABASE IndiandotnetDB
SET CHANGE_TRACKING = ON
(CHANGE_RETENTION = 2 DAYS, AUTO_CLEANUP = ON)

Now let me explain here what is CHANGE_RETENTION & AUTO_CLEANUP property here.

So change retention is feature which tell how many days we have to keep the change history. In above statement we have chosen for 3 days.

Now next feature is AUTO clean_up with this help of this feature we can clean garbage data from temporary storage where SQL SERVER keeping the data.

Step 2:- Now we have to enable same feature on SQL table which is tblStudentSource on which we have to track database.

table_Change_Tracking_Settings

If we see there are two property which is basically mapping  property for which we have enabled this property.

We can run following command as well

ALTER TABLE tblStudentSource
ENABLE CHANGE_TRACKING
WITH (TRACK_COLUMNS_UPDATED = ON)

For tables which we want track we have to enable this feature. Currently I chosen only single table which is tblStudentSource.

Step 3:- We can cross check Whether feature is enabled or not on database and table by running following command

SELECT DB_Name(database_id), * FROM sys.change_tracking_databases
SELECT object_Name(object_Id), * FROM sys.change_tracking_tables

CT_Feature_Check

Step 4:- if we see result of step3 command we will find our CT (Change Tracking) feature is enabled on database & particular table.

Now if we make any changes in table tblStudentSource (or table on which we have enabled this feature).

Now suppose We have inserted,  deleted some records in tblStudentSource table

Before enable Change Tracking feature  we have following table data

Before_Enable

Now once we have enabled this we have inserted a record and deleted a record from tblStudentSource

After_enable

Now to track our changes we have to run following command

SELECT CTTable.StudentId ,
       ssource.FirstName , ssource.LastName,
       ssource.StudentId ,
       ssource.detail,
       ssource.Course,
       CTTable.SYS_CHANGE_OPERATION, CTTable.SYS_CHANGE_VERSION, CTTable.SYS_CHANGE_COLUMNS, CTTable.SYS_CHANGE_CONTEXT
FROM CHANGETABLE (CHANGES tblStudentSource, 1) AS CTTable
LEFT OUTER JOIN tblStudentSource AS ssource
ON ssource.StudentId = CTTable.studentId


CT_Tracking

Now if we see above snap we will find the all the changed row whether it is inserted or deleted is tracked by SQL SERVER and we can find it easily.

Here we would like to see some more important points.

So Whatever changes track by ChangeTracking feature of SQL Server is stored in a internal table which we can find with following command.

SELECT * FROM sys.internal_tables WHERE parent_object_id = OBJECT_ID('tblStudentSource')

internalTable

If you see above query statement which we wrote to determine data which we have changed there is a function which we have used “CHANGETABLE

The first parameter of this function is tablename with changes prefix and second parameter is Change tracking version number. Here Change tracking version number is nothing but a tracking of operation held on that particular version.

We can find the  current version by following command

Change_tracking_Number

SELECT  CHANGE_TRACKING_CURRENT_VERSION()

This version will helpful in synchronization.

I hope this might helpful to you somewhere in your project.

It is a good to know feature.

Thanks

Rj

Saturday, December 20, 2014

Easy way to reseed identity column ? TIP #77


Sometimes, we may require to reseed identity column of a table due to various reason.

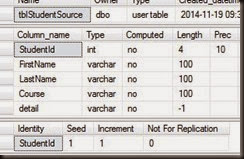
For example we have deleted a record from a Student which have an identity column StudentId.  Below is schema

StudentSchema

Now it has 3 rows as shown below

StudentRows

Now suppose we have deleted record 3 which is studentID 3.

Now when we want to insert a new record StudentId start with 4 and we want it should be 3.

So how to check and reseed it ?

To achieve this task SQL SERVER provided DBCC CHECKIDENT facility.

DBCC CHECKIDENT has 2 commands

1) To Check current Identity value.

DBCC CHECKIDENT (TABLENAME, NORESEED)

2) To reseed an identity column we have following command

DBCC CHECKIDENT ( TABLENAME , RESEED, VALUE) 

Lets check student table identity to check current column value and current Identity value we will write following command

DBCC CHECKIDENT(tblStudentSource,NORESEED)

See below snap when after running this command

Identity_Check

Now if you see 3 is current identity and column value 2 it means if I Insert a new row in tblStudentSource then that row will have studentId = 4 as a next identity column

Now I need to reseed it to 3 means if Insert a new record then studentId should be 3 to do this I have to reseed tblStudentSource.

DBCC CHECKIDENT(tblStudentSource,RESEED,2)

StudentReseed

Now to cross check whether it is reseed or not I write NORESEED command again as get following result

Check_Ressed

It means identity value 2 and current column value is 2 means if now I insert a new record we will get studentId = 3 as a identity column this what we want actually.

So. We did NORESSED, RESSED an identity column.

I hope it may help you somewhere in your work.

Thanks

Rj

Wednesday, December 10, 2014

Sequence feature TIP #76

Although it is a old feature for those who knows ORACLE but for SQL server developers it is a new feature.

Let understand it by an example. Suppose we want an auto incremented column a part from primary key which is a identity column,

then to achieve this we can use sequence feature.

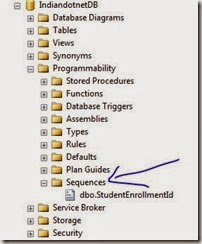
We can create  sequence feature by following command

Sequence

“CREATE SEQUENCE StudentEnrollmentId AS INT
START WITH 2014000
INCREMENT BY 1”

so if you see above statement we have created a sequence with name StudentEnrollmentId which is an integer type sequence and first value means starting point is 2014000 and each time when we call sequence it will be incremented by 1.

We can create same sequence by screen also as shown in below figure

SequenceView

We have other option also  as shown in below

CREATE SEQUENCE SEQUENCE_NAME
AS DATA_TYPE
START WITH <constant>
INCREMENT BY <constant>
MINVALUE value
MAXVALUE value
CYCLE | NO CYCLE
CACHE int | NO CACHE

as shown in above option we can provide minimum & maximum for sequence. We have cycle option mean restart again after reaching maximum or minimum.

Now we can use it with following way

Sequence_1

“SELECT NEXT VALUE FOR StudentEnrollmentId”

I hope this might help you somewhere.

Enjoy !!!

Rj !!!

Saturday, December 6, 2014

How to determine free space on each fixed drive of server machine using SQL SERVER ? TIP #75


When you do  SQL Server maintenance one of important aspect is available space on server drive because your SQL SERVER data is dependent on space Smile.

Now what you need to do to get free space from each drive ?

Just create a simple job which run on daily basis which send you space report on daily basis.

This available space report help you to prepare yourself for next step.

The job will content a simple SQL statement which is

EXEC MASTER..xp_fixeddrives

When you run this command in your SQL Management Studio you will get a tabular result which have 2 columns which is drive & Free space in MB.

As shown in below figure

fixed_drive_space_by_Sql_server_indiandotnet

I hope this might help you somewhere.

Thanks & Enjoy!!!

RJ!!