Pages

Sunday, October 16, 2016

Do you know Compress & Decompress function in SQL SERVER 2016 ?

This is another article in the series of SQL SERVER 2016 Journey . I am pretty much sure you might aware of Gzip Compression algorithm. If not then try  this link.

So, SQL SERVER 2016 introduce this two awesome functions for Compress & Decompress the data.
Before SQL SERVER 2016 version we have data compression feature like Page & Row compression (check Previous post for it Link )which is different then this column value compression.

In SQL SERVER 2016 Compress function,  data compression is done via GZIP algorithm and return VARBINARY(MAX).

Below is the simple syntax of Compress function

Compress (Expression)

Here Expression can be nvarchar(n), nvarchar(max), varchar(n), varchar(max), varbinary(n), varbinary(max), char(n), nchar(n), or binary(n)

Decompress function is just opposite of  compress function. It is used to decompress the value of VARBINARY which is converted using Compress function. The only tweak is you need to cast the output of Decompress function  in specific data type to make it readable (if using varchar ,nvarchar compression) .

below is the simple syntax of Decompress
Decompress (Compressed string)


Let’s understand this via an example as shown below .

Compress function

In this example I have taken 3 tables with exact same schema & data

  1. 1) IndiandotnetFriends
  2. 2) IndiandotnetFriends_Compress
  3. 3) IndiandotneFriends_Decompress

You can see  snap in which we are inserting same data.
As the name suggested in first table normal data from Adventureworks’s person table.
In second table we are inserting compressed value of first Name  and in 3rd table we are inserting decompress value of First Name from the Compressed table.
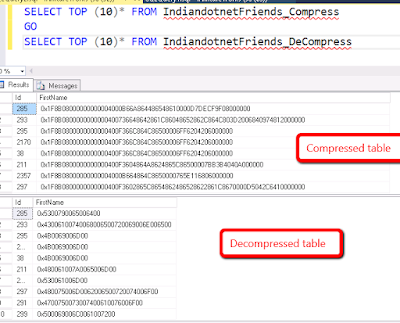
Now, let’s check compress  & decompress table data
Decompress function


Now, Your might thinking that the output of both compress and decompress is not readable.
So you are right to make data readable of Decompress table we need to type cast.
See below snap for same.

Decompress type casting


Till now we know how to use this Compress & Decompress function. Now, let me share the benefit of using Compress. if you see below snap you will find that data length of compress is comparatively less than normal and decompressed data length .

Datalength in compress data


Obviously, compression helps you somewhere in the overall performance of your application.
The good point is  you can pass the compress data to your .net application and decompress using GzipStream as well.

The only thing which we need to take care is type casting. Suppose your base column which compressed is VARCHAR then you need to typecast again in VARCHAR.

Now, next question is where we can use this functions. So,  we can use in compressing large object like binary data in which we save jpg, pdf , word document etc..

I hope you will be excited in using this function.

Please, share your input.
RJ!

Saturday, October 15, 2016

Here Come New Ideas for DROP IF EXISTS in SQL SERVER

In the Series of SQL SERVER 2016 journey, this is our new article. In this article, we are sharing a new cool feature which introduced in SQL SERVER 2016 which is DROP IF EXISTS (DIE) .
In our development many times it happens that we need to drop a table and as a best practice we write the following syntax as shown in below figure

Now, in SQL SERVER 2016 the same task is super easy. You can write the following syntax to drop the table object

DROP TABLE IF EXISTS TABLENAME
The best part is if suppose the object does not exist then  here will be no error execution will continue.
Let me share one more example of Dropping a stored procedure.

Similar, way we can write for following data objects and with the following syntax

Procedure:- DROP PROCEDURE IF EXISTS Procedure Name

Assembly:-
DROP ASSEMBLY IF EXISTS Assembly Name

ROLENAME :-
DROP ROLE IF EXISTS ROLENAME

TRIGGER :-
DROP TRIGGER IF EXISTS Trigger Name

VIEW:-
DROP VIEW IF EXISTS View Name

RULE:-
DROP RULE IF EXISTS RULENAME\

Type:-
DROP TYPE IF EXISTS Type Name

Database:- DROP DATABASE IF EXISTS Database Name

Schema:-
DROP SCHEMA IF EXISTS Schema Name

User:-
DROP USER IF EXISTS Username

SECURITY POLICY:-
DROP SECURITY POLICY IF EXISTS Policy Name

View :-
DROP VIEW IF EXISTS View Name

FUNCTION:-
DROP FUNCTION IF EXISTS Function Name

SEQUENCE:-
DROP SEQUENCE IF EXISTS Sequence Name


Synonym:-
DROP SYNONYM IF EXISTS Synonym Name

I like this feature I am sure you will also like this.

Please, do share your feedback for blog post.
Enjoy !!

Tuesday, October 11, 2016

9 Amazing features of SQL SERVER 2016


Although, I know I am bit late to share this thing on our blog but it says in Indian proverb “Der aai durust aai” means it’s OK you came late but you came that is more important.
Anyways, so you all might aware that Microsoft launched SQL SERVER 2016 officially in June 2016.
You can download the SQL Server 2016 via Link.
Obviously, this is a new revolution in SQL SERVER series. You will find many great features in this version.
This post is beginning to explore all those great features and we will do deep dive in all those features. In this, post we briefly introducing those features. so, without wasting time let me share a brief introduction.
 
1) JSON in SQL SERVER :-
Is this surprising to you ? Obviously, yes. As you might aware that most of the NO SQL database use either JSON or XML. As XML feature already exists in SQL SERVER so this was time for JSON. You can play with JSON in SQL SERVER 2016.
 
2)Always Encrypted :-
If you talk about security this one the best feature. Now, you are thinking what it means. So, It means that the data in the SQL SERVER reside always in encrypted format and SQL server can perform the operation on the encrypted data without decrypting it. The encryption key can be exist in some other system. With this, feature you can secure you ensure that your data is secure from the person like DBA / Developer as well. These guys also can’t see the actual data. Isn’t it neat ?
 
3) Row Level Security :-
This is another interesting feature which helpful especially to the developers  who needs to write extra code to check this. Let me explain this with an example suppose you have a sales team who do market research and you want to restrict that each sales manager can see only those data which entered by him only in such cases you don’t need to write specific condition in your code. It can be achieved by Row Level Security.
 
4) “R” in SQL SERVER :-
For the data scientist, it is a great NEWS. As Resolution Analytics is purchased by Microsoft and It is incorporated in SQL SERVER. You can run R analysis query in SQL Server.
 
5) Temporal Table:-
The Temporal table holds the old version of ROWS of a table. It means that it maintain a copy of the old rows in the table whenever there is an update on the main table.
 
6) PolyBase :-
With the help of this feature, you can access data which exist in Azure Blob or Hadoop cluster using the same SQL server. In the nutshell, we can say this is the technology which combines both relational & non-relational database in a single umbrella which is SQL SERVER. You can run the query directly on external data like Hadoop or Azure blob storage.
 
7) Stretch Database:-
I am pretty much sure by the name you can guess this feature. So, with the Stretch database you have can store your part of the data in the cloud which depends upon your need. You can say most recent transactional data you can store in your local environment and other old data you can store in Azure.
 
8)Query store :-
Another interesting feature to help you in identifying  performance drag using Query store. When you enable this feature it automatically captures a history of queries , plans,  and statics and retain them for review and resolve the performance issues.
 
9) Mobile report:-
As mentioned earlier this is the revolution in SQL SERVER 2016. In SSRS there are many important changes introduced. Now we can import Power BI report in SSRS and apart from this you can create a mobile report which you can run on Mobile.
 
Now, we started officially SQL SERVER 2016 tutorial series.
 
Moving forward we are going to discuss all these features in details and also the couple of new things which introduced in SQL SERVER 2016.
 
enjoy.
Happy VijayDashmi.

Tuesday, March 29, 2016

MS Build 2016 Live Streaming

Watch Live streaming of MS BUILD 2016

Sunday, December 20, 2015

The Unconventional Guide to How to Implement Lookup Transformations TIP #124

This is one the articles in the series of step by step SSIS tutorial. In this post, we are going to understand Lookup transformation and also see an example to implement Lookup transformation in 8 easy steps.
Now, Lookup transformation is one of the interesting transformation which is used to implement equijoin between data sources.
We are discussing the same example which we discuss in the earlier post which is Person & PersonPone tables of AdventureWorks.
Suppose, we want Person details and the phone number of person as a result then we can apply Lookup transformation.
When, we applied the Lookup transformation between Person & Person Phone table then we will get two result set.
One of the result sets is the Matched result set in which we will get the Person data and the First Matched Phone number while the PersonPhone table might have multiple phones for a person but we will get only one phone number record because Lookup transformation uses EquiJoin.
In the second result set, we will get unmatched Person records which mean the Person who doesn’t has a Phone number in PersonPhone table.
I think, we have a basic understanding of what is Lookup Transformation. Now, we are going to implement Lookup Transformation step by step.
Step 1:-
So, the first basic step is to add a package and drag-drop data flow task as shown in below figure. You can rename the  data flow task  as I did in below figure.

Step 2: - In this step drag drop a data source and configure it for Person table as shown in below figure. If you face any difficulties in this then you can review previous articles of this series

Step 3:- Once the Person table is configured just drag drop Lookup Transformation control and provide the input of Person table Data source to Lookup table. When you try to configure the Lookup you will get the following screen. We will discuss Cache mode separately in detail. In this example, we are using Full Cache and connection type to OLEDB connection Manager.
Now, Click on Connection option on the right and configure the PersonPhone table.


Step 4:- Now, configure the Columns relationship between Person & PersonPhone table.To achieve this just drag-drop BusinessEntityId of available input columns of Person table to available Lookup columns which are in PersonPhone table and matched with BusinessEntityId which is common between Person & PersonPhone table. Here we have to select PhoneNumber column which we have to include in the result set.

Step 5:- Now, Drag drop two excel destination source and configure it. As, I did in below figures. Here one Excel is with name LookupOutput.xls which contain matched records.

Below, is another Excel which contains unmatched records. Here UnMatched means the Person records who don’t have phone numbers.

Step 6:- Now, If you see there are 3 output lines coming from Lookup transformation.So, First blue output gives it to Lookupoutput excel which will have all the matched records of person & Person Phone number. You can configure inputs as shown below.

Step 7:- In a similar way, we have to configure unmatched record output. Once, we done with configuration of both Matched & unmatched output, we will get following structure as shown in below screen


Step 8:-  Once, everything is configured you can run the package and if everything is perfect then you will get the following screen

I hope above steps are easy and you can implement Lookup Transformation at your end too.
Please, provide your inputs.
Enjoy !!!
RJ!!!


Friday, December 18, 2015

How to do Step by Step Merge Join Transformations - #123

In last post tip #122, We discussed Merge transformation. Now in this tip, we are going to discuss Merge Join. Although, it might be confusing sometimes Merge & Merge Join. So, let me explain it here.
As explain earlier merge is like a union operation in which it just collect all the records from provided sources without any condition. suppose if we have Person & PersonPhones two sources as shown below
Below is Person table with two columns personId & Name
PersonId Name
1 Ram
2 Shyam
3 Ghanshyam
Below is PersonPhones table with two columns PersonId & Phone
PersonId Phone
1 9999
2 3122
3 3422
Now if we talk about merge transformation then the result would be as shown below
Merge Transformation output
PersonId Name Phone
1 Ram  
2 Shyam  
3 Ghanshyam  
1   9999
2   3122
3   3422
Now, If we talk about Merge Join transformation for above same inputs (Person, PersonPhones) then we will get following output
PersonId Name Phone
1 Ram 9999
2 Shyam 3122
3 GhanShyam 3422
So, Merge Join is basically a join like Inner join, Left outer join, Full outer join etc.
I hope you got the context. Here we go step by step to implement the Merge join transformation
Step 1:-  Add the different sources which you want. For this example I am taking two sources which have AdventureWorks database and one source have Person table & another one have PersonPhone as shown above in the example.
We added data flow task as shown in below image and renamed it to Merge join data flow task.

Now, in this data flow task, we will add data sources, in the first source we use person table and in the second source we use PersonPhone.
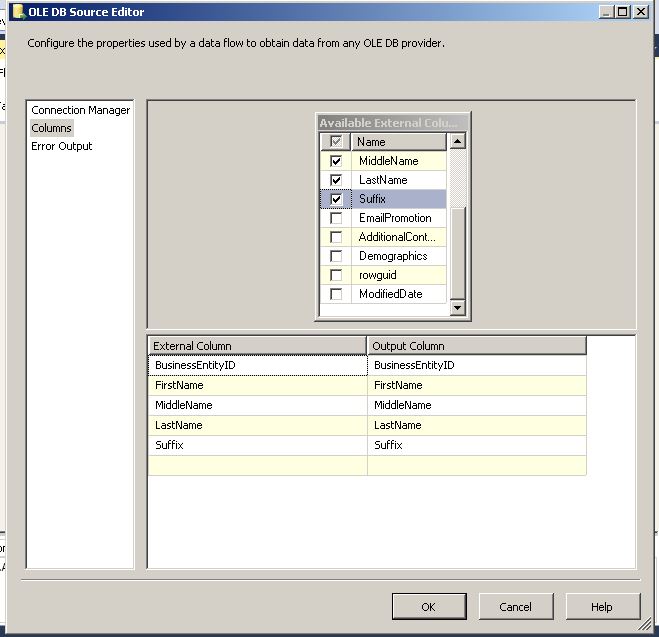
from person table, we are choosing BusinessEntityId, FirstName,MiddleName, LastName,suffix as shown in below figure
 
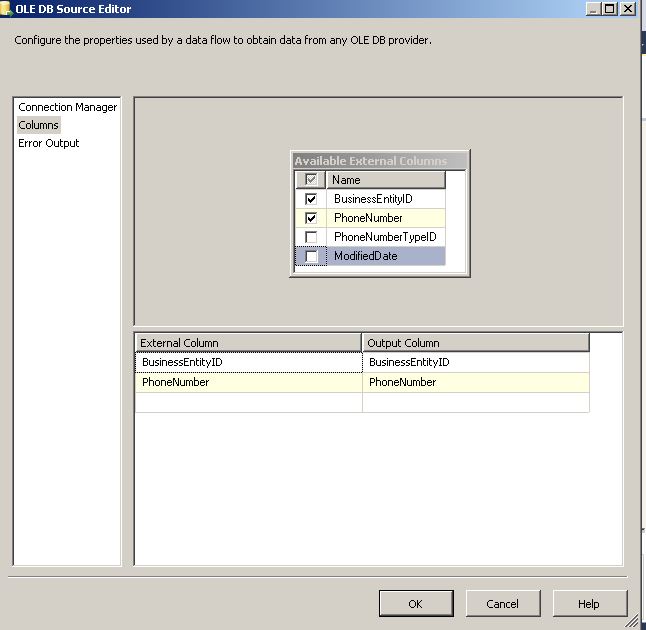
In the other source, we are using BusinessEntityId & Phone number columns.

If you find any issue in above steps then please, follow previous articles of step by step SSIS on Indiandotnet.
Step 2:- Now once the source is configured, we are going to drag drop merge control as shown in below figure.

Step 3:- Now to configure Merge join, we are going to drag drop inputs from the sources. When you try this at your end then you will get the following screen. Here you have to set left input and right input for the merge join.

Now, When you tried it you might found following warning. Which means the provided inputs of datasource1 & datasource2 are not sorted.

Step 4:- Here you have the option to add a Sort transformation and then provide input to merge join transformation control which is fairly simple and we have discussed in previous tips. Here, I am sharing one more option.
In this, you have to right click on DataSource and choose option Advance Editor by which you will get the following screen. You have to select “OLEDB Source output” of “Input and output Properties” tab.
Here, we need to make the IsSorted property to True as highlighted in below snap.


Step 5:- Once the above Step is done next step is click on output column’s BusinessEntityId value. Here you have to set the SortKeyPosition to 1.
As highlighted in below screen.


Step 6:- Once you configured sorted input sources then next step is to configure the merge join. So when you click on Edit option of merge join. You will get the following screen.
Here if you see, we can configure join type like Inner join, Left outer join, Full outer join.
For current example, we are choosing the option “Inner join”  and joining key is BusinessEntityId which is primary key in Person table and foreign key in PersonPhone table.

Once the configuration is done. We can select what are the columns which we need as an output.
Step 7:- Now, Next step is to configure the output in excel. for this, we drag & drop a destination source. In the current example, we are using Excel as a destination. We are mapping the columns of output to excel as shown in below figures.


Step 8:- Once, everything is configured. We run the package and if everything is working fine then we will get the following screen.

To cross check the result we open the excel and we get the output which we expected as shown in below figure.

I hope this article might help you to understand the Merge join.
Enjoy !!!
RJ!!