Pages

Showing posts with label New Feature of SQL SERVER. Show all posts

Monday, March 27, 2017

How easy it is to implement Row Level Security in SQL SERVER 2016 ?

To understand RLS (ROW LEVEL SECURITY) let’s understand the different problems first.
Problem 1 Suppose, you have a Multi-tenant e-commerce website and different companies registered on your website and you have centralized single database for all the client. Now as a product owner it is your responsibility that one tenant’s data should not be available to another tenant.  This is a very common problem.
2. Now, Suppose you have hospital database in which you have login user of different doctors & nurses. Now, your challenge is to show data to doctor or nurses to their relevant patient to whom they are giving treatment, not any other patient data should be available .
Here, limiting the user’s access to only certain rows of the data in database many have various reasons like compliance standards, regulatory need or security reasons.
Now, I know you were thinking that all the above problem can be resolved at code side easily by writing custom logic. I will say here yes you are right but this is not the 100% solution.  For example, if you have 4 different application like web, mobile, console, windows (Excel) and all has their own DAL then you have to implement this custom logic to every application and suppose  tomorrow if any time a new 3rd party came which want to integrate your data  or access database directly then in such cases it is tuff to apply same logic.
So, all the above problem can be easily handle using SQL SERVER 2016’s feature which is ROW Level Security (RLS). Security is one of the key areas which is handled in SQL SERVER 2016 very seriously.  As RLS (Row Level Security) is centralized security logic so you don’t need to repeat same security logic again and again.
As the name suggested Security implemented at Row Level in SQL SERVER 2016. In the Row Level, Security data is access according to user roles. It is a centralized data access Logic.
RLS has following properties
  • Fine-grained access role ( control both read & write  access to specific rows)
  • Application transparency  ( No application changes required)
  • Centralized the access within the database
  • Easy to implement & maintain
How RLS works?
RLS   is a predicate based function which runs seamlessly every time when a SQL is run on particular table on which RLS  predicate function implemented.
There are 2 predicates  which can be implemented in RLS
1) Filter Predicate: - By the name, it is clear that it will filter the row or we can say exclude the rows which do not satisfy the predicate and stop further option like select, Update & Delete.
for example: Suppose, you want to restrict doctor to see other doctor’s patient data then in such case you can apply filter predicate.
2) Block Predicate: -  This predicate helps in implementing policy by which insert, update and delete rows will prevent which violate the filter predicate. In other words, we can say it explicitly block write operation.
For example, you have multi-tenant application and you want to restrict one tenant user to insert or update other tenant’s data. Or suppose you have sales representative who belongs to specific region so they can not insert , update or delete other region’s data.
Demo:-
I know you will be super excited to see the demo of this feature so. Let’s do it right away.
There are 2 basic steps to create RLS
a) Create inline table function  or we can say predicate function  and write custom logic to control user access to every row
b) create the security policy and apply it.
In this demo ,I am creating a  new table called Patients which has following schema. 


Here, I have inserted 2 rows for Nurse1 & 2 rows for Nurse2

The objective is to show only those rows to Nurse1, Nurse2 in which they are the in charge and a doctor user can see entire table’s data.
To achieve this let first create 3 users  in database 
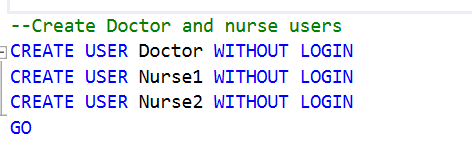

Once the users are created the next step is to grant permission of select to Nurse1 & Nurse2 user and full permission to doctor user.


Now, before creating function it is a standard to create a security schema in our case we are creating a schema with name sec as shown in below figure.
Now, create a function which will have security logic. The Logic is very simple if the user is doctor Or any in charge name then return 1 else 0.


Now create a security policy to proceed further


Till now we are good to go. Now, let’s test the security policy.
Firstly, running the select query with default user “dbo.”  and we have not given permission for this user if you see fn_RLSPredicate we have not mentioned it so obviously the result would show “0” records.

Now, running the same select statement but executing with “Nurse1” login then you will find 2 records which are relevant to Nurse1 is visible.

Similarly, I am running the same statement for Nurse2 user by running command “Execute as user” so, again I will get 2 records

Now, running the same statement with Doctor user and as per our expectation, it should show all 4 records.

So, as you can see we have achieved the goal using RLS (Row Level Security) feature. Now, next thing which might occur in your mind how to disable this policy if required then doesn’t worry it is very simple. Just alter the security policy and make state = off as shown in below figure.

I hope till now we are good to work on RLS. In next couple of post, we will dig deeper in RLS.
Please, share your thought for RLS.

Saturday, October 22, 2016

How DATEDIFF_BIG a new feature of SQL SERVER 2016 Can Keep You Out of Trouble

In the series of SQL SERVER 2016, this is a new post. in this post, we will discuss DATEDIFF_BIG and how it is helpful.
So, before jumping into directly in technical details, we all know that time is very important and every second valuable and countable but sometimes every microsecond & nanosecond is also countable Smile . For such operations in which every microsecond & nanosecond is countable, we can use DATEDIFF_BIG function.
As you aware the BIGINT range is from -9,223,372,036,854,775,808 to 9,223,372,036,854,775,807.  Here if any difference (Micro & Nano) second is out of the the mentioned range then DATEDIFF returns that value else return error(Obviously).
Below is the basic syntax if DATEDIFF_BIG although it is similar to DATEDIFF. We can say it is a extended version of DATEDIFF.
DATEDIFF_BIG( datePart, start Date, End date)
The value of datePart is same like DATEDIFF function.
For example if you want to collect millisecond difference then use ms, microsecond then mcs and for nanosecond ns.
As per the MSDN   for the Millisecond, the maximum difference between start date & end date is 24 days, 20 hours, 21 minutes and 23,647 seconds. For Second, the maximum difference is  68 years.  
Now, let see why this DATEDIFF_BIG introduced so, I am running a DATEDIFF  function in SQL SERVER 2012 and see what we get after running that query.

DATEDIFF_BIG in SQL SERVER 2016


You can see in above query we got an error of overflow.
Now, we are calculating the same difference from DATEDIFF_BIG in SQL SERVER 2016. See, below snap for same.

DATEDIFF_BIG in SQL SERVER 2016 by Indiandotnet


Isn’t it great ? Although, I am scarred with those applications who calculate milliseconds Sad smile.
Anyways, it is good to know feature.
Do provide your feedback for the post it is very valuable for us.
RJ !!!

If You Read One Article About Split String in SQL SERVER 2016s Read this One #3

In the Series of SQL SERVER 2016, this is another post. Before Jumping in detail just think if you have a comma or other separator string and if you have to split it by separator field then for such task  in previous SQL SERVER versions either you will write a function which split the string and return desire values in a column  or
you will use XML function or  might be different custom functions.
Let me explain this with below example. Suppose you have a string like below
DECLARE @FriendList AS VARCHAR(1000)
SET @FriendList ='Ravi,Suyash,Vaibhav,Shyam,Pankaj,Rajul,Javed'

Now you want output like below
String split in SQL SERVER 2016


Then in such cases, you will  follow 2 approaches (their might be other as well)

Approach 1:- Write  a function like below  and use it.
Different ways of spliting a comma seperated string in SQL


And once this function is created you can use like below
custom string split function


Approach 2 :- You can use XML option in SQL SERVER as  shown in below

split string using XML in SQL SERVER

So, the good news is now in SQL SERVER 2016 you don’t need to write  so many lines to split any string. In SQL SERVER 2016 a new string function is Introduced which is
STRING_SPLIT
The use of this function is very easy and below is the syntax
STRING_SPLIT (string, separator)
Now, let me show you same output using STRING_SPLIT function
string_split function in SQL SERVER 2016


Isn’t it easy ?
I hope you will like this easy way to split the string.
Provide your feedback.
RJ !!!

Tuesday, October 11, 2016

9 Amazing features of SQL SERVER 2016


Although, I know I am bit late to share this thing on our blog but it says in Indian proverb “Der aai durust aai” means it’s OK you came late but you came that is more important.
Anyways, so you all might aware that Microsoft launched SQL SERVER 2016 officially in June 2016.
You can download the SQL Server 2016 via Link.
Obviously, this is a new revolution in SQL SERVER series. You will find many great features in this version.
This post is beginning to explore all those great features and we will do deep dive in all those features. In this, post we briefly introducing those features. so, without wasting time let me share a brief introduction.
 
1) JSON in SQL SERVER :-
Is this surprising to you ? Obviously, yes. As you might aware that most of the NO SQL database use either JSON or XML. As XML feature already exists in SQL SERVER so this was time for JSON. You can play with JSON in SQL SERVER 2016.
 
2)Always Encrypted :-
If you talk about security this one the best feature. Now, you are thinking what it means. So, It means that the data in the SQL SERVER reside always in encrypted format and SQL server can perform the operation on the encrypted data without decrypting it. The encryption key can be exist in some other system. With this, feature you can secure you ensure that your data is secure from the person like DBA / Developer as well. These guys also can’t see the actual data. Isn’t it neat ?
 
3) Row Level Security :-
This is another interesting feature which helpful especially to the developers  who needs to write extra code to check this. Let me explain this with an example suppose you have a sales team who do market research and you want to restrict that each sales manager can see only those data which entered by him only in such cases you don’t need to write specific condition in your code. It can be achieved by Row Level Security.
 
4) “R” in SQL SERVER :-
For the data scientist, it is a great NEWS. As Resolution Analytics is purchased by Microsoft and It is incorporated in SQL SERVER. You can run R analysis query in SQL Server.
 
5) Temporal Table:-
The Temporal table holds the old version of ROWS of a table. It means that it maintain a copy of the old rows in the table whenever there is an update on the main table.
 
6) PolyBase :-
With the help of this feature, you can access data which exist in Azure Blob or Hadoop cluster using the same SQL server. In the nutshell, we can say this is the technology which combines both relational & non-relational database in a single umbrella which is SQL SERVER. You can run the query directly on external data like Hadoop or Azure blob storage.
 
7) Stretch Database:-
I am pretty much sure by the name you can guess this feature. So, with the Stretch database you have can store your part of the data in the cloud which depends upon your need. You can say most recent transactional data you can store in your local environment and other old data you can store in Azure.
 
8)Query store :-
Another interesting feature to help you in identifying  performance drag using Query store. When you enable this feature it automatically captures a history of queries , plans,  and statics and retain them for review and resolve the performance issues.
 
9) Mobile report:-
As mentioned earlier this is the revolution in SQL SERVER 2016. In SSRS there are many important changes introduced. Now we can import Power BI report in SSRS and apart from this you can create a mobile report which you can run on Mobile.
 
Now, we started officially SQL SERVER 2016 tutorial series.
 
Moving forward we are going to discuss all these features in details and also the couple of new things which introduced in SQL SERVER 2016.
 
enjoy.
Happy VijayDashmi.

Sunday, August 9, 2015

An interesting setting for NULL but don’t use it for future TIP #109

As we discussed earlier in TIP#103 for NULL in which I shared that we have to take extra care for NULL.

Now in this tip I would like to share one of the interesting setting for NULL. Although it is just for knowledge but don’t use it because it is deprecated in future version and by default you this setting is always on.

Still you are thinking for which setting I am talking about.

So , I am talking about “CONCAT_NULL_YIELDS_NULL”  . Let’s understand it by following example . By Default CONCAT_NULL_YIELDS_NULL is ON which means if anything added to NULL will be null as discussed earlier in our tip #103

SET_CONCAT_NULL_ON_INDIANDOTNET

Now, see what happens when we do it OFF.

SET_CONCAT_NULL_OFF_INDIANDOTNET

So, We clearly saw in above image  when we set the CONCATE_NULL_YIELDS_NULL property to OFF it dissolved the NULL property.

My take on this property is that we should avoid it don’t try to make it OFF explicitly because if we do this then we explicitly breaking some hidden business rules.

I hope you will like this post.

Enjoy !!!

RJ !!

Saturday, August 8, 2015

A big issue when try to Alter user define table type structure TIP #108


I hope all of you aware of  User define table type (a table value parameter) which we discussed earlier in TIP #57.

Now recently one interesting incident happened. We are using a user define table type in few stored procedure and due to some business requirement change we need to change /update data type of a particular column from TINYINT to SMALLINT.

Now this change was seems very simple you just need to change a column’s data type  but when you are going to do this, you will find this is not pretty straight forward (if the User define table type is referred in different tables).

If you go through standard steps you need to follow below steps (for  a column data type change)

1) Create a new User define table  type

2) Replaced old User define table  type with new user define table type in each stored procedures

3) Remove old User define table type.

And , I would like to say a big thanks  Mr.Norlado  who post an alternative on stackoverflow

below is the alternative steps

1) Rename the existing table type with following command

EXEC sys.sp_rename 'dbo.StudentTableType', 'zStudentTableType';

2) Create Table type with your  changes which you want


CREATE TYPE dbo.StudentTableType AS TABLE(
    StudentId INT NOT NULL,
    Name VARCHAR(255) NOT NULL,
    ClassId SMALLINT -- changed from tinyInt to smallint
);

3. Update the reference in sql entities


DECLARE @Name NVARCHAR(776);

DECLARE REF_CURSOR CURSOR FOR
SELECT referencing_schema_name + '.' + referencing_entity_name
FROM sys.dm_sql_referencing_entities('dbo.StudentTableType', 'TYPE');

OPEN REF_CURSOR;

FETCH NEXT FROM REF_CURSOR INTO @Name;
WHILE (@@FETCH_STATUS = 0)
BEGIN
    EXEC sys.sp_refreshsqlmodule @name = @Name;
    FETCH NEXT FROM REF_CURSOR INTO @Name;
END;

CLOSE REF_CURSOR;
DEALLOCATE REF_CURSOR;

4. Now drop the renamed table type

DROP TYPE dbo.zStudentTableType;

This 4 steps helped me a lot.

I hope this may help you as well.

Enjoy!!!

RJ!!!

Sunday, July 26, 2015

A simple way for consistency TIP #106


Whenever we develop application of maintain application we define sets of rules or policies  like naming convention , data type, database & SQL SERVER properties (like which property should be unable or disable)  but the problem is to cross check or to enforce these properties is very tedious.

To enforce the policies SQL SERVER provided a great feature which is Policy Based Management.  This is the feature which helps you to not only write the policies or rules but also enforce and cross check whether those rules or policies is followed in your environment or not.

Although these feature is mainly for A DBA but I think it is good for a everyone who love SQL Server.

Now let me share an example which will help us to better understand Policy Based Management.

So to begin with  firstly we have to open the Policy Based Management’s interface. Which we can get in Management folder in SQL SERVER’s object explore window. (You can see below yellow highlighted)

1

So when you expand the Policy Management in Management feature  You will see 3 different folders which are facets , condition and policies.

So there are  around 84 in build facets which is basically properties for different conditions.

Conditions are basically simple check applied using facets.

Policies are created on condition which will enforce once it created.

Below I am creating policy to check table who has row count =0 (Little bit odd) .You can try with stored procedure name not started with sp_ (will be good start as well).

So , Now create a simple condition by right click and choosing menu New condition

2

You will get following screen just add condition

3

We are creating a simple condition which will check the table which has RowCount is 0.

11

Once you created this condition you will get condition in conditions folder.

4

Now once condition is created we have to create policy. To create policy we have to right click on policy and select new policy.

5

When you click the new policy you will get following screen

6

Now we can add check Condition which we have created as shown in below figure. We can apply policy against target Like in below snap we want policy against every table for IndiandotnetDB

NewPolicy

We can set evaluation mode according to our need.

Once you saved the policy we can run it any time.

We can evaluate policy by right click Evaluate as shown in below figure

9

When we run the policy we will get following result

10

So , If you see above highlighted row which means a table contain  Row Count.

I hope with above steps you understand a basic way to create Policy Base Management concept.

Policy based management is surely a great tool to manage  database.

Please feel free to give a chance whether you are DBA or not.

Enjoy PBM !!

Happy learning !!

RJ

Sunday, April 26, 2015

How to send E-mail/E-mail with Attachments in SQL Server TIP #97


In last post, TIP#96 We have configured Database E-mail. Now in this post we will see how to send mail in SQL SERVER.

Sometimes we need to send mail for different requirements like

1) Notification mails like  data inserted /updated/deleted successfully

2)Send data reports like no of amount earned, failed transaction  etc.

for this SQL SERVER provides us stored procedure “sp_send_dbMail”.

The “SP_send_dbmail” has various parameters below are some important parameters like

@profile_Name : The profile which will use to send mail

@Recipients : To whom the mails need to be send

@body : This is message body

@Subject: Subject of the mail

@Query : SQL statement which you want to share

To send a simple E-mail  we can write following statements

EXEC msdb.dbo.sp_send_dbmail
    @profile_name = 'IndiandotnetMailSmtp',
    @recipients = 'rajatjai@gmail.com',
    @body = 'Mail sent successfully.',
    @subject = 'Mail via SQL SERVER ' ;

We can also send a query result either inline text format or html format or as a  attachment

Below query will send mail to me with count of students of a class. the below mail is simple text format mail

EXEC msdb.dbo.sp_send_dbmail
    @profile_name = 'IndiandotnetMailSmtp',
    @recipients = 'rajatjai@gmail.com',
    @query = 'SELECT COUNT(1), Class FROM IndiandotnetDB.dbo.tblStudent GROUP BY class' ,
    @subject = 'Mail via SQL SERVER ' ;

The above mail can also be send mail as a attachment with following command

EXEC msdb.dbo.sp_send_dbmail
    @profile_name = 'IndiandotnetMailSmtp',
    @recipients = 'rajatjai@gmail.com',
    @query = 'SELECT COUNT(1), Class FROM IndiandotnetDB.dbo.tblStudent GROUP BY class' ,
    @subject = 'Mail via SQL SERVER ' ,
    @attach_query_result_as_file = 1 ;

We can add @body_format = 'HTML' and use various HTML tag in query or body parameters

A part from this you can cross check E-mail status whether mail is sent or not if it is not sent the what is the reason.

Below are the statements which can help to cross check mail sent status

-- Show all the emails

SELECT * FROM msdb.dbo.sysmail_allitems

-- Show all the  sent mails
SELECT * FROM msdb.dbo.sysmail_sentitems

-- show all the un sent mails
SELECT * FROM msdb.dbo.sysmail_unsentitems

-- show all the failed mail with reason
SELECT * FROM msdb.dbo.sysmail_faileditems

I hope this might help you somewhere.

Enjoy!!

RJ

Monday, March 23, 2015

How to resolve Space issue in SQL server 2005 TIP #93


Hello friends,
Many times we face space issues with our database. To resolve this problem SQL Server 2005 provided one more solution which is VARDECIMAL feature.

** VARDECIMAL feature exist in SQL SERVER’s Developer & Enterprise edition.

** This feature is not available in SQL Server 2005’s Standard edition.
I hope by the name it is clear that what VARDECIMAL functionality is.
If not then please read below line VAR + Decimal = VARDECIMAL
It is just like VARCHAR features means it will consume space which is actual require to store the decimal value. It ignores null and zero value to save space
. To understand it more lets implement it.
I am taking an example here
First we will check the database size without applying the VARDECIMAL Feature .
To check the current space use below command
    Use Your Database name;
    GO
    Sp_spaceused;
The above command provides you current space used by the database. Now we will check whether the VARDECIMAL feature is enabled or not to check this we can use two way go to database property and check it as shown in below fig
vardecimal_step1
Or
use below command
   exec sp_db_vardecimal_storage_format
Now to enable the property on particular database either make the property true in above fig
or use following command
    exec sp_db_vardecimal_storage_format ‘Your DatabaseName’, ‘ON’
Once the database has VARDECIMAL storage format.
We need to apply VARDECIMAL storage property on actual table. Before applying the feature first check the space of existing table which can be determine by following command.
   Sp_spaceused table Name;
Now check whether the table has VARDECIMAL feature enable or not. To check this feature just right click on table and check table property.
Now to enable this property use following command
   sp_tableoption ‘YourTableName’, ‘vardecimal storage format’, 1
vardecimal_step2
Once you run this option on database you will find the property on the table is now true.
Now to check how much space gain you got use again
    Sp_spaceUsed table name ;
command.
Now compare the space with existing result and check how much you gain in terms of space.
I hope this feature will help you in some where if you are using SQL Server 2005 Enterprise edition.
Enjoy!!
RJ

Tuesday, March 3, 2015

Kill–use this weapon carefully in SQL SERVER . TIP #90

When we heard “Kill” then first impression of this word is very bad. We always scare with this word.

In real world we never want this action  from anyone but in SQL Server case it is very helpful and help us many times.

This feature we can use but very carefully. It is something like we have to kill a cruel giant not the common innocent person.

Lets understand this by an example.

Suppose we wrote a stored procedure or function and by mistake we wrote a condition which is never ending. We didn’t realize this and when we run the stored procedure/function the SQL Server hangs , system is slow and many other issues occur and our stored procedure which we run still running and laughing on us.

In such situation we have to kill that particular stored procedure execution statement which is cruel giant and eating the resources.

See below statement

WHILE 1=1
BEGIN
  SELECT 'Infinite Loop'
END

It is never ending loop. and it is running on our SQL SERVER and will never stop.

Now first step is to Identify the process id for this statement for this we can use either sp_Who or sp_who2 which we discussed in TIP #82.

Now when we run it you will find on Database “IndiandotnetDB” we have a SPID 53 which is last statement on below image. This SPID 53 is reference of above while loop which we have to stop any ways.

sp_who2_Inadiandotnet

Now we know SPID so we can stop or KILL  as shown below the syntax is very simple of KILL

KILL SPID

Kill_Process_Indiandtnet

Now we are good to go.

Note: Please use this KILL statement very carefully.

I hope this tip will help you some where to KILL or stop SQL SERVER enemies.

Enjoy !!!

RJ!!!

Saturday, February 28, 2015

Secure your password with HashBytes TIP #89

Dear Friends,

In my last article (TIP 87) I wrote about PWDENCRYPT.  I forgot to write few details but thanks to all my talented friends & blog readers who guided me by providing there feedback on post.

I respect their inputs and always interested to get more inputs. Thanks to all of you.

Now I would like to share information about “HASHBYTES”  function which is also available for secure your password using various Hash algorithms like MD2 , MD4 , MD5 , SHA ,SHA1 , SHA2_256 , SHA2_512.

The PWDENCRYPT  can be use but  HASHBYTES function provides you various options to make your content robust secure.

The Syntax is very easy as shown below

HASHBYTES (ALGORITHM, ‘INPUT WHICH YOU WANT TO SECURE’)

Now let see an example to understand it more

HASHBYTES

Just wanted to add here that SHA2_256, SHA2_512 available with 2012 version and above.

Someone said this line right “More option More confusion”

Now we have different algorithm then which one we have to use so the answer is (according to my knowledge) use the latest most secure one Like SHA1, SHA2 etc.

I hope this article may be useful to you.

Thanks !!!

RJ!!!

Tuesday, February 24, 2015

How to Encrypt password in SQL Server ? TIP #87

Security is always a concern for every database developer. How to secure valuable information is one of the major and important aspect.

The first approach toward security to have a strong username & password and the next step is to have password in encrypted form.

Now this article will help you to encrypt your password in hash. Isn’t it interesting ?

So SQL Server provided a function by using that particular simple function we can encrypt a password from plain text to hash.

The valuable function is PWDENCRYPT.  By the name it is clear that it will crease the password.

The syntax is very simple PWDENCRYPT(N’String which yyou want to encrypt’)

see below snap for more detail.

PWDEncrypted_Indiandotnet

I hope this tip help you to secure your password.

Enjoy !!

Thanks

RJ

How easy to determine table dependencies ? TIP # 86


Determine the table dependencies is challenging sometime but we can easily resolve this by using a simple stored procedure which  SQL Server provides.

By using this stored procedure we can easily determine all the dependencies of particular table.

The stored procedure is sp_msdependencies

We can use this stored procedure as shown below

Execute sp_msdependencies ‘tableName’

For example I am using Adventureworks2012 and I want to know the dependencies of product table then I have to write following command

Use AdventureWorks2012
Go
EXEC sp_msdependencies '[Production].[Product]'
GO

When I run this command I get result as shown in below figure

sp_msdependecies_Indiandotnet

I hope this tip may help you somewhere.

Thanks for reading.

Enjoy !!!

Rj !!!

Saturday, December 27, 2014

Change Data Capture (CDC)–An easy way to track data changes of a database–TIP #79


In last TIP #78  we have discussed Change tracker (CT) which was introduced in SQL SERVER 2008. CT feature only tracks which row is changes means on which row Insert/update/delete operation is performed but it does not track what exact value is changed.

If we want an audit of database means whatever changes occurred in database we want to capture those changes and later on see what are changes made then before CDC feature we have to right triggers but now in this case we can use Change Data capture (CDC) feature.

By the name it is clear that it capture the data which is changed.

Lets understand here step by step how to enable this feature

Step 1:- The first important step is to enable CDC on selected database. To enable CDC we have to write following command

EXEC sys.sp_cdc_enable_db

EnableCDC

Note:- sometime you may get error while doing this so just cross check your database owner.

We can cross check whether CDC enable or not on database by following command

SELECT [name], database_id, is_cdc_enabled  FROM sys.databases  WHERE is_cdc_enabled = 1

CDC_Enable_database_List

Step 2:- Once we have enabled CDC setting on Database then we need to enable same setting for table which we need to capture.

For this we have to write following command

EXEC sys.sp_cdc_enable_table
    @source_schema ='dbo',
    @source_name ='tblStudentCDC',
    @role_name ='StudentCDCRole',
    @supports_net_changes = 1

image

Now When we run above command, we will find following items added in our database. We will find new tables created automatically in our database under CDC schema as shown in below figure

New_cdc_tables_for_StudentCDC

Whenever we enable CDC for a table a new table is created in System tables (if already not created) under a new schema which is “CDC” which denote change data capture.

a) CDC.captured_Columns:- This table contains all the captured columns of a CDC enabled tables.

As shown in below figure:

SELECT * FROM [cdc].[Captured_Columns]

cdc_captured_Columns

b) CDC.Change_tables:- By the name it is clear that this will table will contain list of all the tables on which we have enabled CDC feature.

SELECT * FROM [cdc].[change_tables]

cdc_change_tables

c)CDC.Index_Columns:-  This table keeps information of all the Indexes of a table

SELECT * FROM [CDC].[Index_Columns]

cdc_index_column_detail

d) [cdc].[ddl_history]:-  This table contains all the information of schema changes of a CDC enabled table.

SELECT * FROM [CDC].[ddl_History]

e)[CDC]. [lsn_time_mapping]:-  This table keeps all the LSN ( Log Sequence Number)related information. The base of this table is whatever the transaction done on the CDC enabled table that will be capture in this table.

SELECT * FROM [CDC].[lsn_time_mapping]

cdc_lsn

On the same time few jobs also created which you can find in SQL SERVER agent as shown in below figure

SQL_Server_Agent

Step 3:-We can also cross check all CDC enabled tables by using following command

SELECT [name], is_tracked_by_cdc  FROM sys.tables  WHERE is_tracked_by_cdc = 1

Cross_check_CDC_enable_Table

Step 4:-  Every captured table has suffix _CT and  the name is same as enabled CDC table. In current scenario we have enabled CDC feature on tblStudentCDC so the capture table is tblStudentCDC_CT.

Now we can find all the data change reference of a CDC enabled table by following command.

SELECT * FROM [cdc].[dbo_tblStudentCDC_CT]

tbl_StudentCDC_CT

Sometimes it is also called mirror table which keeps all the track.We will find following extra columns

_$Start_lsn,_$end_lst_$sequal,_$Opeartion,_$updatemask

_$Operation column track all the operations on the table and the different values denotes  different operations status as mention below
Like if value is 1 then it is a Delete Statement (means record deleted from main table)
if value is 2 then it is Insert Statement (means record inserted in main table)
if value is 3 then it denotes Value before Update Statement
if value is 4 then it denotes Value after Update Statement

So, with this easy steps we can enable CDC on database and tables and can enjoy this feature.

We can easily disable this feature which we will discuss in the next post.

Till than enjoy CDC.

Enjoy !!!

RJ !!!