Pages

Showing posts with label Step by step. Show all posts

Sunday, December 20, 2015

The Unconventional Guide to How to Implement Lookup Transformations TIP #124

This is one the articles in the series of step by step SSIS tutorial. In this post, we are going to understand Lookup transformation and also see an example to implement Lookup transformation in 8 easy steps.
Now, Lookup transformation is one of the interesting transformation which is used to implement equijoin between data sources.
We are discussing the same example which we discuss in the earlier post which is Person & PersonPone tables of AdventureWorks.
Suppose, we want Person details and the phone number of person as a result then we can apply Lookup transformation.
When, we applied the Lookup transformation between Person & Person Phone table then we will get two result set.
One of the result sets is the Matched result set in which we will get the Person data and the First Matched Phone number while the PersonPhone table might have multiple phones for a person but we will get only one phone number record because Lookup transformation uses EquiJoin.
In the second result set, we will get unmatched Person records which mean the Person who doesn’t has a Phone number in PersonPhone table.
I think, we have a basic understanding of what is Lookup Transformation. Now, we are going to implement Lookup Transformation step by step.
Step 1:-
So, the first basic step is to add a package and drag-drop data flow task as shown in below figure. You can rename the  data flow task  as I did in below figure.

Step 2: - In this step drag drop a data source and configure it for Person table as shown in below figure. If you face any difficulties in this then you can review previous articles of this series

Step 3:- Once the Person table is configured just drag drop Lookup Transformation control and provide the input of Person table Data source to Lookup table. When you try to configure the Lookup you will get the following screen. We will discuss Cache mode separately in detail. In this example, we are using Full Cache and connection type to OLEDB connection Manager.
Now, Click on Connection option on the right and configure the PersonPhone table.


Step 4:- Now, configure the Columns relationship between Person & PersonPhone table.To achieve this just drag-drop BusinessEntityId of available input columns of Person table to available Lookup columns which are in PersonPhone table and matched with BusinessEntityId which is common between Person & PersonPhone table. Here we have to select PhoneNumber column which we have to include in the result set.

Step 5:- Now, Drag drop two excel destination source and configure it. As, I did in below figures. Here one Excel is with name LookupOutput.xls which contain matched records.

Below, is another Excel which contains unmatched records. Here UnMatched means the Person records who don’t have phone numbers.

Step 6:- Now, If you see there are 3 output lines coming from Lookup transformation.So, First blue output gives it to Lookupoutput excel which will have all the matched records of person & Person Phone number. You can configure inputs as shown below.

Step 7:- In a similar way, we have to configure unmatched record output. Once, we done with configuration of both Matched & unmatched output, we will get following structure as shown in below screen


Step 8:-  Once, everything is configured you can run the package and if everything is perfect then you will get the following screen

I hope above steps are easy and you can implement Lookup Transformation at your end too.
Please, provide your inputs.
Enjoy !!!
RJ!!!


Friday, December 18, 2015

How to do Step by Step Merge Join Transformations - #123

In last post tip #122, We discussed Merge transformation. Now in this tip, we are going to discuss Merge Join. Although, it might be confusing sometimes Merge & Merge Join. So, let me explain it here.
As explain earlier merge is like a union operation in which it just collect all the records from provided sources without any condition. suppose if we have Person & PersonPhones two sources as shown below
Below is Person table with two columns personId & Name
PersonId Name
1 Ram
2 Shyam
3 Ghanshyam
Below is PersonPhones table with two columns PersonId & Phone
PersonId Phone
1 9999
2 3122
3 3422
Now if we talk about merge transformation then the result would be as shown below
Merge Transformation output
PersonId Name Phone
1 Ram  
2 Shyam  
3 Ghanshyam  
1   9999
2   3122
3   3422
Now, If we talk about Merge Join transformation for above same inputs (Person, PersonPhones) then we will get following output
PersonId Name Phone
1 Ram 9999
2 Shyam 3122
3 GhanShyam 3422
So, Merge Join is basically a join like Inner join, Left outer join, Full outer join etc.
I hope you got the context. Here we go step by step to implement the Merge join transformation
Step 1:-  Add the different sources which you want. For this example I am taking two sources which have AdventureWorks database and one source have Person table & another one have PersonPhone as shown above in the example.
We added data flow task as shown in below image and renamed it to Merge join data flow task.

Now, in this data flow task, we will add data sources, in the first source we use person table and in the second source we use PersonPhone.
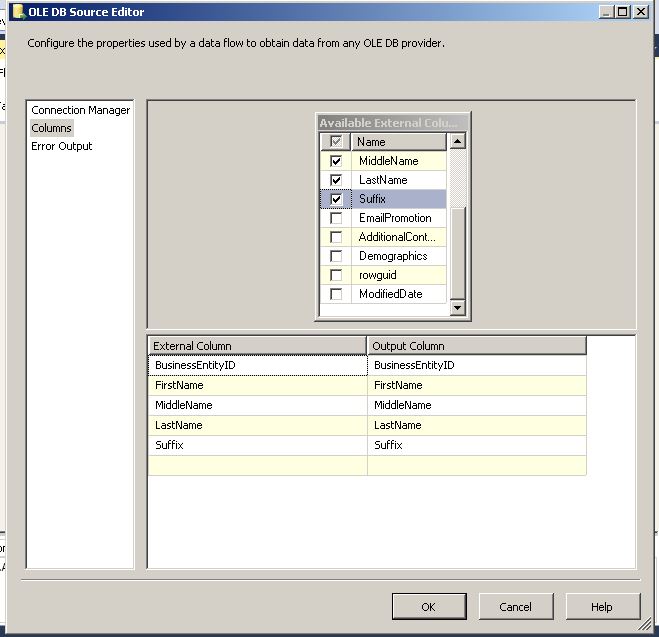
from person table, we are choosing BusinessEntityId, FirstName,MiddleName, LastName,suffix as shown in below figure
 
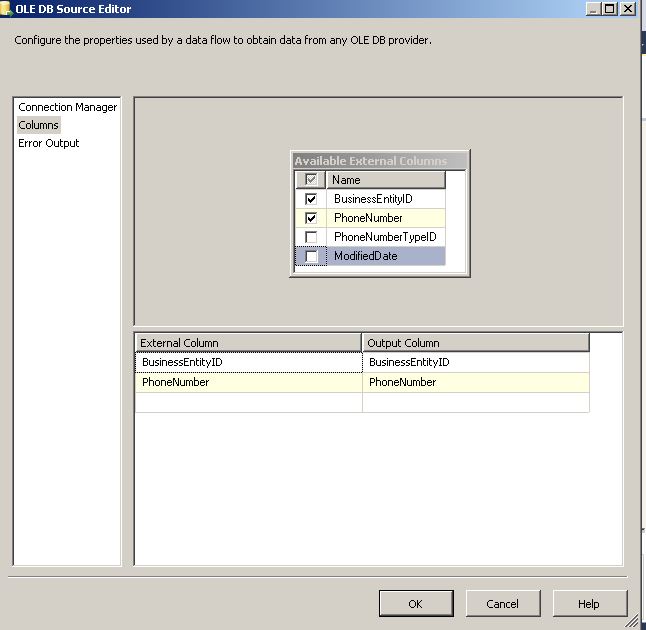
In the other source, we are using BusinessEntityId & Phone number columns.

If you find any issue in above steps then please, follow previous articles of step by step SSIS on Indiandotnet.
Step 2:- Now once the source is configured, we are going to drag drop merge control as shown in below figure.

Step 3:- Now to configure Merge join, we are going to drag drop inputs from the sources. When you try this at your end then you will get the following screen. Here you have to set left input and right input for the merge join.

Now, When you tried it you might found following warning. Which means the provided inputs of datasource1 & datasource2 are not sorted.

Step 4:- Here you have the option to add a Sort transformation and then provide input to merge join transformation control which is fairly simple and we have discussed in previous tips. Here, I am sharing one more option.
In this, you have to right click on DataSource and choose option Advance Editor by which you will get the following screen. You have to select “OLEDB Source output” of “Input and output Properties” tab.
Here, we need to make the IsSorted property to True as highlighted in below snap.


Step 5:- Once the above Step is done next step is click on output column’s BusinessEntityId value. Here you have to set the SortKeyPosition to 1.
As highlighted in below screen.


Step 6:- Once you configured sorted input sources then next step is to configure the merge join. So when you click on Edit option of merge join. You will get the following screen.
Here if you see, we can configure join type like Inner join, Left outer join, Full outer join.
For current example, we are choosing the option “Inner join”  and joining key is BusinessEntityId which is primary key in Person table and foreign key in PersonPhone table.

Once the configuration is done. We can select what are the columns which we need as an output.
Step 7:- Now, Next step is to configure the output in excel. for this, we drag & drop a destination source. In the current example, we are using Excel as a destination. We are mapping the columns of output to excel as shown in below figures.


Step 8:- Once, everything is configured. We run the package and if everything is working fine then we will get the following screen.

To cross check the result we open the excel and we get the output which we expected as shown in below figure.

I hope this article might help you to understand the Merge join.
Enjoy !!!
RJ!!

Sunday, December 13, 2015

Step by Step Merge transformation control in SSIS TIP #122

In the Series of Zero to hero in SSIS  this is another post. In this post we are going to discuss Merge transformation control.

By the name it is clear that Merge transformation do some merge related task. For example suppose there is two sources which are source1
and source2. Now we want merge records of Source1 & Source2 then this transformation is helpful.
Although, sometimes you might confuse that there is already UNION ALL transformation the when to use UNION ALL or Merge transformation.
For Merge transformation we require sorted inputs and there is only two inputs required. The output of merge transformation will be sorted output.
Let’s start it Step by Step
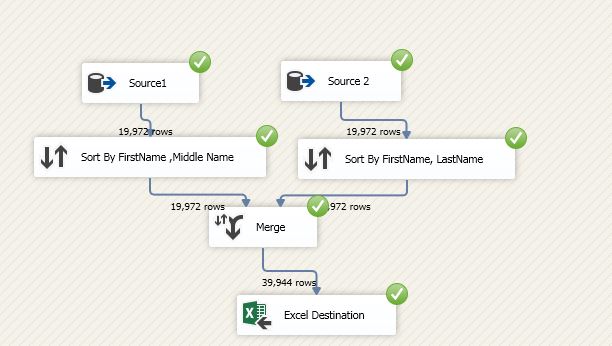
Step 1:- Firstly configure the sources. In current example I am using AdventureWorks2008 database’s person table and using FirstName, LastName, MiddleName columns as a Source1. For Source2  I am using AdventureWorks2012 database’s person table and using FirstName, LastName, MiddleName again. (You can choose any different source like flat file, excel ,other data source provider as well to make it simple I am  using same source)
source1
Step 2:- Once you setup your data source the next mandatory condition is the output should be sorted. So here we are using Sort transformation control. Now for first source we are sorting data on FirstName,MiddleName, LastName.
Sort1
and for second source we are sorting data on FirstName , LastName ,MiddleName


Step 3: Now once we have two sorted input we are going to use Merge transformation control so just drag drop and configure it. As shown in below figure. So there are two inputs which is Merge Input 1 & Merge Input 2 and we configured the data according to our need. And if you see below screen you will find “Configure the properties used to merge two sorted inputs into one output” which means for Merge transformation we require two sorted inputs only.


Step 4:- Now,we want the output of merge transformation in an excel so, here dropped Excel destination and configure it.So  you can see below configured package with excel destination.

Step 5:- Now just hit F5 or run it. If everything configured properly then you will get all the green checks with no of rows count at each level as shown in below figure

Step 6:- We can cross check Excel also so in my case we got the required data as shown in below Excel's snapshot.


So, Isn’t it simple ?
Here the important points to remember
1) Merge requires Sorted inputs only
2) Merge requires only two inputs
I hope this tutorial might help you. I appreciate your feedback.
Enjoy !!
RJ!!

Sunday, October 18, 2015

Step by Step SSIS Multicast Transformation TIP #121

Dear Friends,

This is another post in the series of step by step SSIS ,Zero to hero series. In this post we will discuss another transformation control which is Multicast transformation.

Multicast is a way which help us to provide multiple copy of same source data for different transformation. Or in other words we can say multicast transformation create multiple pipelines for the same data.

Lets understand this by an example. Suppose, we are product developer and selling product in different state in India. Now ,the problem is same product may have different selling price due to different tax system. So, we have to use same data of product but there will be different discount according to sate tax.

Now, here we go step by step. for your information in this example we are going to use similar example which we did in last post of Derived column Transformation tip #120

Step 1:- Add a package and drag drop data flow task and configure source database. I am taking Adventurework2012 database and using product &  productCategory tables for source data query below is simple snap of data

Data1

Step 2:- Once the data is configured. Drag drop Multicast control  as shown in below figure and give output of source object to Multicast and try to configure it.

DragDropMulticast

Step 3:- Now, when we have configured Multicast we can get multiple output from Multicast control. Suppose , One state is taking 10% WAT tax, another state taking 20% WAT tax and last one is taking no tax (wow that’s great). So we can drag drop derived column and configure then according to 10% ,20% WAT tax for reference you can take a look of tip #120 

I configured the the 3 different output in same way and adding the respective flat files. As shown in below figure you will see we added 3 files

1) with 10% ,with 20 % and without and tax

FileDestination

After configuration you will get structure something like as shown in below image. As a result we will get 3 flat files with 10% ,20% and without any change.

finalDesign

Step 4:- If you face any difficulty in Derived column configuration and moving the data to file please follow earlier post. Now once everything is configured run the package by pressing F5 or hitting run button you will get following screen. So , if you see Multicast providing similar row count to different output which is 295 rows.

Final_Result

We , can use this Multicast where we need multiple copy of same source data.

I hope this article might help you somewhere.

Enjoy !!!

RJ !!

Saturday, October 17, 2015

Step by Step SSIS–Union ALL tip # 119


Dear All,

In the series of  zero to hero SSIS series this is one of the simplest transformation control which known as UNION ALL. 

As you might aware UNION in general term  which means collective. In SSIS UNION all control is doing the same task.

It collect all the inputs may be of same type of sources or different type of sources and  union them all and provides single output for the same.

Lets understand this by below example.

Suppose, We have different text files which contain fruits &  vegetables name. Now our aim is to combine all the fruits and vegetables name which exists in these files.

if you see below image you will find 3 files which FruitA (Contains fruit names start with letter A) , FruitB (Contain fruit names start with  letter B), FruitP (contains fruit name start with letter P)

Files Now we need to combine this file using UNION ALL transformation. So follow below step by step

1) Step 1:- Step 1 is simplest step and now you all well versed in this. We need to add a new SSIS package file and drag drop  data flow task .

2) Step 2:- Now add different flat file source for all the 3 files and configure all the 3 files  fruitA.txt, fruitB.txt , fruitP.txt .

3) Once we configured all the 3 flat file sources, We have to drag drop UNION ALL transformation control.Once we drag drop UNION ALL we can provide the output of all the 3 files as a input in UNION ALL control as shown in below  figure.

source

Step 4:- Now, we have to configure the UNION ALL control. To do this right click on UNION ALL control and click on EDIT option. Here we have to configure all the columns which we need to union.

ConfigureUnionAll

Step 5:- Once the UNION ALL is configured our next step is to get the output of UNION ALL in a resultant file. for this we have to drag drop destination flat file control as shown in below figure.

file

Step 6:- Now we have to configure the flat file destination and save it to specific location. A part from this we have to provide input to flat file destination which will be output of UNION ALL control. As shown in below figure I am saving the file on same location and giving name finaloutput.txt

finaloutput

Step 7:- Once all the above step is processed by us the final step is to run the package for this just click on RUN icon or hit F5. If everything is working fine the we will get following  result with all the green right check images.

finaloutputREsult

If you see above image we did union of all the 3 files and saved output in a single file.

Now, for learning purpose and to make the post simplest I use only same type source you can use different type of source and destination as per your need.

A part from this UNION ALL doesn’t remove duplicate so if there are duplicates in the files it will not remove.

I hope this article will help you somewhere.  Please provide your inputs.

Enjoy !!!

RJ!!!

Saturday, September 5, 2015

How to deploy SSIS Package ? Step by Step SSIS TIP #114

Dear Friends,
In last post we have successfully created our fist basic package. So, Now the next thing is how to deploy this package.

We have created this package for someone else or our client so we need to run this package on his /her machine.

For this we need to know how to deploy. Lets start this step by step 

Step 1:- Open the existing solution and right click on the solution you will get following options as shown in figure. You need to click on “Convert to Package Deployment Model”   as highlighted below

convert_To_Package

Step 2:- Once you click it you might get popup for confirmation just click OK.

Package_model_cofirmation

Step 3: Now click on Properties you will get following screen in which you need to select the deployment option. And need to select true value for CreateDeploymentUtility as highlighted below in figure. Once You make this option true  press OK or Apply Button.

Properties 

Step 4:- Once you done with this again right click on the solution and again click on Covert to Package deployment model.  Now this time you will get Wizard screen as shown below. Click on Next button

Convert_Wizard_1

Step 5:- You will get below screen which is package selection screen. (Suppose you have multiple packages in a solution so for which package you want to create deployment you need to check / Uncheck according to your need.) Once you selected the Package click on Next button.

Wizard2

Step 6:- When you click next button you will get next option which is specific project properties as shown below in screen. In this we have an important option which is Protection level. It is use to set the level of showing sensitive data in package. for example a package may contain sql server connection string in which we have username and password and username and password are very important and sensitive information. Here ,with protection level we have option to encrypt this sensitive data or make package password protected. This will be an interesting topic which we will discuss separately in near future in separate post. for current time being just leave the default option as is and click on next button.

wizard3

Step 7:- When you click on next button you will get following screen. This is the screen where you can call another package which this deployment. We will discuss it later for current deployment process we don’t want to call any other package.  Just click on next button.

wizard4

Step 8:- When you click on next button you will get following screen which says about configurations. We can create a configuration file which is just a simple XML file. If you are a .NET developer just assume it web.config file where we can keep connection string or other configurable item.

wizard5

Step 9:- We can create parameters which can be use to pass the values in packages. In current solution we have not configured even parameters so don’t think to much about this currently. We will discuss it separately in coming post.

wizard6

Step 10:- Now directly jump to Perform Conversion and skip review step. and click next you will get following screen of popup. Press OK and then try to rebuild the solution.

wizard10

Step 11:- We did  a build/rebuild to cross check package is correct. Now open the deployment folder in bin folder (You can find the address in step 3’s screen) . When you open the folder you will get two files one is Your package file with DTSX extension and another one which is called manifest file as shown in the figure below. Below ExportSQLToFlatFile is our manifest file  and Package is our actual DTSX package file. (if we have config file then you will find config file as well)

Package_Manifest_Location

Step 12:- Now, we successfully completed our first part of deployment which is basically creating a package deployment file which is a manifest file. We can copy these files on any server where we need to deploy the package. When you click on Manifest file which is ExportSQLToFlatFile you will get following screen

Actual_Deployment_1

Step 13: Click on Next button when you get above screen you will get following screen which shows 2 options of package deployment

1) File System deployment 2)  SQL Server deployment

Now for current demo we are using file system deployment and clicking next button.

Actual_Deployment_2

Step 14:- When we click next button we get the screen which ask for folder where package will be deploy by default it is SQL SERVER’s DTS package folder so let it be currently and click Next button

Actual_Deployment_3

Step 15:- After clicking next button , we will get following screen. Which is a confirmation screen for deployment.

Actual_Deployment_4

Step 16:- Now the last step click the finish button and we are good to go.

Actual_Deployment_5

So all the above steps are for creating a deployment for package and then deploy in SQL SERVER. Now , I am sure your next question will be what now ?

So, now we call this Package in SQL SERVER Job and configure job which execute this package time to time.

We, will discuss it more in detail coming post.

I hope you will like this post. please do post your inputs.

Thanks

Raj