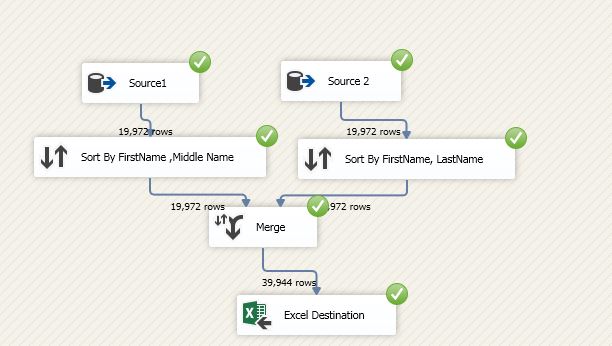
Sunday, December 13, 2015
Step by Step Merge transformation control in SSIS TIP #122
Sunday, October 18, 2015
Step by Step SSIS Multicast Transformation TIP #121
Dear Friends,
This is another post in the series of step by step SSIS ,Zero to hero series. In this post we will discuss another transformation control which is Multicast transformation.
Multicast is a way which help us to provide multiple copy of same source data for different transformation. Or in other words we can say multicast transformation create multiple pipelines for the same data.
Lets understand this by an example. Suppose, we are product developer and selling product in different state in India. Now ,the problem is same product may have different selling price due to different tax system. So, we have to use same data of product but there will be different discount according to sate tax.
Now, here we go step by step. for your information in this example we are going to use similar example which we did in last post of Derived column Transformation tip #120
Step 1:- Add a package and drag drop data flow task and configure source database. I am taking Adventurework2012 database and using product & productCategory tables for source data query below is simple snap of data
Step 2:- Once the data is configured. Drag drop Multicast control as shown in below figure and give output of source object to Multicast and try to configure it.
Step 3:- Now, when we have configured Multicast we can get multiple output from Multicast control. Suppose , One state is taking 10% WAT tax, another state taking 20% WAT tax and last one is taking no tax (wow that’s great). So we can drag drop derived column and configure then according to 10% ,20% WAT tax for reference you can take a look of tip #120
I configured the the 3 different output in same way and adding the respective flat files. As shown in below figure you will see we added 3 files
1) with 10% ,with 20 % and without and tax
After configuration you will get structure something like as shown in below image. As a result we will get 3 flat files with 10% ,20% and without any change.
Step 4:- If you face any difficulty in Derived column configuration and moving the data to file please follow earlier post. Now once everything is configured run the package by pressing F5 or hitting run button you will get following screen. So , if you see Multicast providing similar row count to different output which is 295 rows.
We , can use this Multicast where we need multiple copy of same source data.
I hope this article might help you somewhere.
Enjoy !!!
RJ !!
Step by Step SSIS–Derived Column Transformation TIP # 120
Dear Friends,
In the series of Step by Step SSIS , Zero to Hero in SSIS this is another post in which we will try to understand what is Derived Column Transformation.
Let’s understand this by a real world example. Suppose, we are a shop keeper and our work is buy things from carpenter and sell them by adding our 20% margin.
So , carpenters give us source data (file, sql server etc) with their rate according to product. What we do actually ,we add another column in our register by adding 20% which is our selling price. So ,our selling price column is a derived column here which we derived from source by adding some of our operations.
Isn’t it simple ?
Let’s understand this now step by step. I am using Adventureworks2012 database here as a source database and using product & ProductCategory table combination query. So , Assume this source data is data of carpenter’s products. Here if you see below image we have productId, Product Name, color,Category & ListPrice (price at which we (Shop Keeper bought the the product)
Step 1:- It is useless to say here add a new Package in your project. Drag drop data flow task on canvas. Now double click the data flow task you will get a new screen where you need to drag drop source Assistance.
Now,need to configure source assistance where database will be adveturework2012. If you see below we have same columns which we shared earlier in figure
Step 2:- I am sure you will not face any problem in configuration of source control. Now in step 2 we have to drag drop Derived column. Once you drag drop derived column you need to provide output of source assistance to Derived Column Transformation. Now to configure this use context menu by right clicking and choose Edit option you will get below screen. Here we have different functions and operators which we can be utilized with columns and variables and parameters to create derived column.
If you see above highlighted row in image we can add a new column or can replace any existing column as shown in drop down.
Step 3:- If you see there is expression column also where we can add custom expression. Here we are multiplying 0.20 in list price and adding it again in Listprice and aliasing this new column SellingRate as shown in below figure
if you see below screenshot we can add other functions ,operators also.
Step 4:- I hope above steps are pretty much clear. Now add a destination file in which we will get derived column “SellingRate” . We have to configured the derived column. As shown in below figure we configured derived column.
Step 5:- Now, Once the destination file is configured run the package by pressing F5 or clicking run option. If everything working fine then we will get all the green checkbox sign as shown below figure
I hope this post might help you to understand the derived column.
Enjoy !!!
RJ!!!
Saturday, October 17, 2015
Step by Step SSIS–Union ALL tip # 119
Dear All,
In the series of zero to hero SSIS series this is one of the simplest transformation control which known as UNION ALL.
As you might aware UNION in general term which means collective. In SSIS UNION all control is doing the same task.
It collect all the inputs may be of same type of sources or different type of sources and union them all and provides single output for the same.
Lets understand this by below example.
Suppose, We have different text files which contain fruits & vegetables name. Now our aim is to combine all the fruits and vegetables name which exists in these files.
if you see below image you will find 3 files which FruitA (Contains fruit names start with letter A) , FruitB (Contain fruit names start with letter B), FruitP (contains fruit name start with letter P)
Now we need to combine this file using UNION ALL transformation. So follow below step by step
1) Step 1:- Step 1 is simplest step and now you all well versed in this. We need to add a new SSIS package file and drag drop data flow task .
2) Step 2:- Now add different flat file source for all the 3 files and configure all the 3 files fruitA.txt, fruitB.txt , fruitP.txt .
3) Once we configured all the 3 flat file sources, We have to drag drop UNION ALL transformation control.Once we drag drop UNION ALL we can provide the output of all the 3 files as a input in UNION ALL control as shown in below figure.
Step 4:- Now, we have to configure the UNION ALL control. To do this right click on UNION ALL control and click on EDIT option. Here we have to configure all the columns which we need to union.
Step 5:- Once the UNION ALL is configured our next step is to get the output of UNION ALL in a resultant file. for this we have to drag drop destination flat file control as shown in below figure.
Step 6:- Now we have to configure the flat file destination and save it to specific location. A part from this we have to provide input to flat file destination which will be output of UNION ALL control. As shown in below figure I am saving the file on same location and giving name finaloutput.txt
Step 7:- Once all the above step is processed by us the final step is to run the package for this just click on RUN icon or hit F5. If everything is working fine the we will get following result with all the green right check images.
If you see above image we did union of all the 3 files and saved output in a single file.
Now, for learning purpose and to make the post simplest I use only same type source you can use different type of source and destination as per your need.
A part from this UNION ALL doesn’t remove duplicate so if there are duplicates in the files it will not remove.
I hope this article will help you somewhere. Please provide your inputs.
Enjoy !!!
RJ!!!
Friday, October 2, 2015
Step by Step SSIS–Aggregate Transformation TIP #118
Dear Friends,
In the series of step by step SSIS tutorial this is another post. In this post we will see Aggregate Transformation. I am pretty much sure you are aware of aggregation. Although , Just wanted to share that aggregation operation in generally memory expensive operation.
So, whenever you want aggregation & want to use group by function then in such situation you can use Aggregation transformation.
There are different group by option available like MIN, MAX , COUNT, SUM, AVERAGE etc.
Let’s understand how to use Aggregate transformation step by step.
For current example we are using Adventureworks database and we are using below query. Here we are fetching the product data with line total,unit price & other details.
if you see the records in the table you will find that there are multiple records for same product with different line total.
Our objective is to aggregate or do sum of Line total according to Line Number and export the result in a csv.
Step 1:- So , Now start with package creation add a new package in solution and drag drop source Assistant and configure the database connection as we did earlier in the tutorials
Step 1.1 – Drag drop Data flow task
Step 1.2 – double click data flow task and drag drop source assistance control
Step 1.3 – Configure source assistance
Step 2: Once the source assistance is configured with SQL SERVER connection string and specific query we will drag drop Aggregate Transformation control as shown in below figure
Step 3:- Now configure this aggregate control. So Just right click aggregate control and select Edit option. Now as we require Sum of LineTotal so we have selected SUM in operation column’s drop down and rest other has drop down option group by.
Step 4:-
Now, drag drop flat file destination and configure it.
Now configure flat file with mapping as shown in below figures
Step 5: Now run it you will get desire result as shown in below figure
If you see in the result we got 757 rows after processing 121,317
Now see the result in actual as shown in below file
I hope this example might help you to understand Aggregate transformation. Please provide your inputs.
Enjoy !!
RJ!!!
Monday, September 21, 2015
Step by Step SSIS - Conditional Split Transformation TIP #117
In the series of Zero to Hero in SSIS this is our next post. In this post we will see Conditional Split transformation.
I am pretty much sure that by the name you got some impression what it would be.
So, a Conditional Split Transformation is a way by which you can conditionally split an input into multiple output.
Suppose, You are a food supplier and you cook both veg & non veg food. Now according to orders by client you need to move those order requests to particular kitchen to prepare those orders.
Let’s understand it by following step by step execution example.
In this example , I am using AdventureWorks database as a source database connection. We are fetching products along with categories. We need Bikes products in different file and rest other product in different file. You can see products with categories shown below in this image Accessories , bikes are the categories.
Step 1:- Create a new package and drag drop data flow task control and double click it. You will get a new screen which data flow task. Now drag drop Source Assistance. from SSIS controls tool bar.
Now as usual we have to configure the database connection string and set the database to adventureworks.
Step 2:- Once the database is configured right click on control and choose edit property. You will get below screen where you need to specify the query which we shown earlier in figure.
Once you done with above steps you need to configure columns as well so, click on Columns and configure it.
Step 3:- Now drag drop conditional split and connect input arrow to it as shown in figure
Step 4:- Now choose edit option by right clicking the conditional split and configure it. When you click you will get screen like below. You will find different condition operator. One important point to remember here you need to drag drop column name to condition textbox. As our aim is to have product with Bikes category in a different file and other categories in different file.So we use following condition as shown in below figure.
Step 5:-Now drag drop a flat file destination and assign the output of the above conditional split to File destination. You will get following screen. As you see we are assigning Bike condition output to this file which means all the products which belongs to bikes categories should be available in this.
Step 6: Now Configure the flat file destination by choosing the edit option.
Step 7:- In similar way we have to capture the output which not belongs to Bikes category as shown in below figure
Step 8: In nutshell we will get following screen
We almost done here. Now to check whether this conditional split is working or not. To check this hit F5 or run the package. So, if you see below everything working fine. We got 32 rows in bike category and 73 rows in other categories.
To cross check result we will see the file output as well
So , If you go through all the above steps we have achieved Conditional split example.
I hope this post might help you to understand conditional split.
In next step we will go for next step in SSIS.
Enjoy !!!
RJ!!!